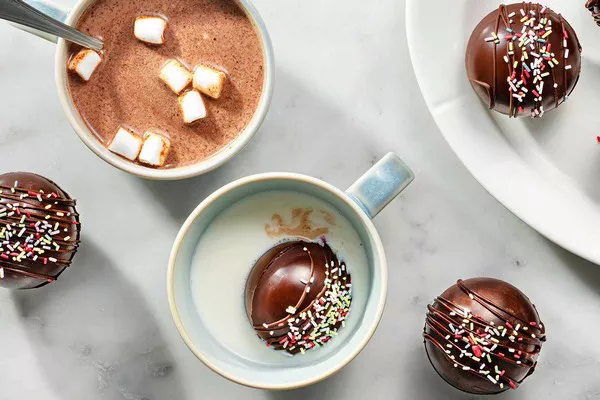
Hot cocoa cup bombs are a fun and festive way to enjoy a warm cup of hot chocolate. Imagine dropping a beautifully decorated, chocolatey bomb into a mug of hot milk and watching it melt, releasing cocoa powder, marshmallows, and a burst of rich flavor. These little treats are perfect for holidays, gift-giving, or just a cozy night in. In this guide, we’ll walk you through how to make your very own hot cocoa cup bombs from start to finish.
What Are Hot Cocoa Cup Bombs?
Hot cocoa cup bombs, sometimes known as hot chocolate bombs, are spheres made of chocolate that contain hot cocoa mix and marshmallows inside. When you drop them into a cup of hot milk, the chocolate shell melts away, releasing the cocoa mix and marshmallows for an instant, delicious cup of hot chocolate.
These bombs come in various sizes, shapes, and designs, making them a fun, customizable treat. You can add different fillings like chocolate chips, crushed candy canes, or flavored extracts to make them unique.
Let’s dive into the detailed steps of making these cocoa bombs!
Ingredients Needed
Before you start making hot cocoa cup bombs, make sure you have all the ingredients and equipment ready. Here’s what you’ll need:
For the Chocolate Shell:
Chocolate: You can use milk chocolate, dark chocolate, or white chocolate, depending on your preference. The chocolate needs to be high-quality and easy to melt.
Coconut oil (optional): Adding a small amount of coconut oil to your melted chocolate can help make the shells more glossy and smooth.
For the Filling:
Hot cocoa mix: You can use store-bought hot cocoa mix or make your own using cocoa powder, sugar, and a pinch of salt.
Marshmallows: Mini marshmallows work best for this recipe. You can also add fun variations like marshmallow shapes or flavored marshmallows.
Extras (optional): For extra flavor, you can include chocolate chips, crushed candy canes, crushed cookies, or flavored extracts like vanilla or peppermint.
For Decorating (optional):
Sprinkles: Use festive sprinkles for a colorful touch.
Chocolate drizzle: Drizzle extra melted chocolate on top for a fancy finish.
Edible glitter or gold leaf: For a special touch, edible glitter or gold leaf can make your cocoa bombs look more luxurious.
Equipment:
Silicone sphere mold: A silicone mold is ideal for making the chocolate spheres. You can find these in most baking or craft stores, or order them online.
Microwave-safe bowl or double boiler for melting the chocolate
Spoon or pastry brush for spreading chocolate
Parchment paper for setting the bombs
Hot milk for serving (about 8 ounces per bomb)
Step 1: Preparing the Chocolate Shell
Melt the Chocolate
Start by melting your chocolate. You can do this in two ways:
Microwave method: Break your chocolate into small chunks or chips, and place them in a microwave-safe bowl. Microwave in 30-second intervals, stirring in between, until the chocolate is smooth and fully melted. Be careful not to overheat the chocolate to prevent it from seizing.
Double boiler method: Fill a pot with a small amount of water, and bring it to a simmer. Place a heatproof bowl over the pot (making sure the bowl doesn’t touch the water) and add the chocolate. Stir the chocolate until it melts smoothly.
If you’re using coconut oil, add about 1 tablespoon of coconut oil per 2 cups of chocolate. This will make the chocolate smooth and shiny.
Coat the Molds
Once the chocolate is melted, it’s time to coat your molds. Use a spoon or pastry brush to apply a thin layer of chocolate to the inside of each silicone mold. Make sure to coat the sides evenly, creating a good shell. The thicker the chocolate layer, the more solid your cocoa bomb will be.
Let the chocolate cool and harden. If you want a thicker shell, you can apply a second layer after the first one has set. Place the mold in the fridge or freezer for about 10 minutes to speed up the hardening process.
Step 2: Filling the Cocoa Bombs
Add the Hot Cocoa Mix
Once the chocolate shell has fully set, carefully remove it from the mold. If you used a silicone mold, it should pop out easily. Place each shell on a clean, flat surface.
Spoon about 1-2 tablespoons of hot cocoa mix into each shell. This is the base of your hot chocolate flavor, so make sure you use a generous amount.
Add the Marshmallows
Next, add mini marshmallows on top of the cocoa powder. You can fill the shells about halfway with marshmallows or use a full layer, depending on your preference. If you want to make it extra fun, you can use different types of marshmallows like rainbow or heart-shaped ones.
If you want to make your cocoa bombs even more exciting, this is the time to add other ingredients like chocolate chips, crushed candy canes, or flavored extracts.
Step 3: Sealing the Cocoa Bombs
Warm the Edges
To seal the cocoa bomb, you need to slightly melt the edges of the chocolate shells. Here’s how:
- Heat a plate or a pan in the microwave for about 30 seconds. Once it’s warm (but not too hot), gently press the open edge of one chocolate half onto the warm plate. The heat will slightly melt the chocolate, making it soft and tacky.
- Place the melted edge onto the other half of the cocoa bomb, carefully pressing them together. Hold them for a few seconds to allow the edges to stick.
If the chocolate doesn’t seal perfectly, you can use a little more melted chocolate to “glue” the two halves together. Just use a spoon to apply a thin layer of chocolate to the edges before pressing them together.
Set and Harden
Once the two halves are sealed, place the cocoa bombs on a sheet of parchment paper and let them cool for 10-15 minutes, or until the chocolate is completely hardened. You can also pop them in the fridge for a quicker set.
Step 4: Decorating the Cocoa Bombs
Add Drizzle and Sprinkles
For a festive touch, drizzle some melted chocolate over the top of your cocoa bomb and sprinkle it with colorful sprinkles or edible glitter. You can also add a few extra marshmallows on top to make them look even more inviting.
If you’re making these for special occasions, like Christmas or Valentine’s Day, you can use themed sprinkles, edible decorations, or even edible gold leaf for a glamorous touch.
Step 5: Enjoying Your Hot Cocoa Cup Bombs
Once your cocoa bombs are ready and beautifully decorated, they’re ready to use! To enjoy your creation:
- Place one cocoa bomb into a mug.
- Heat 8 ounces of milk (you can use any type of milk: dairy, almond, oat, etc.).
- Pour the hot milk over the cocoa bomb and watch as the chocolate shell melts, revealing the cocoa mix and marshmallows inside.
- Stir everything together with a spoon, and you’ve got a rich, creamy cup of hot chocolate!
Tips for Making the Best Hot Cocoa Bombs
Use good-quality chocolate: The flavor of your cocoa bomb depends a lot on the chocolate you use. Choose a chocolate that you enjoy eating on its own.
Customize the fillings: Get creative with what you put inside. You can add crushed cookies, flavored syrups, or even flavored hot cocoa mix.
Make them in advance: Hot cocoa bombs make great gifts or party favors. You can make them in advance and store them in an airtight container for up to two weeks.
Use a silicone mold: Silicone molds are the easiest to work with for making cocoa bombs. They’re flexible, so the chocolate will pop out without breaking.
Conclusion
Making hot cocoa cup bombs is a fun and creative way to enjoy hot chocolate. With just a few ingredients, a bit of time, and a sprinkle of creativity, you can craft these delicious treats. Whether you’re making them for yourself or giving them as a thoughtful gift, hot cocoa bombs are sure to bring warmth and joy.
By following this step-by-step guide, you’ll be able to create beautiful, mouth-watering cocoa bombs that are as fun to make as they are to drink. So gather your ingredients, grab your silicone molds, and get ready to create some magical cocoa bombs!
Related topics:

