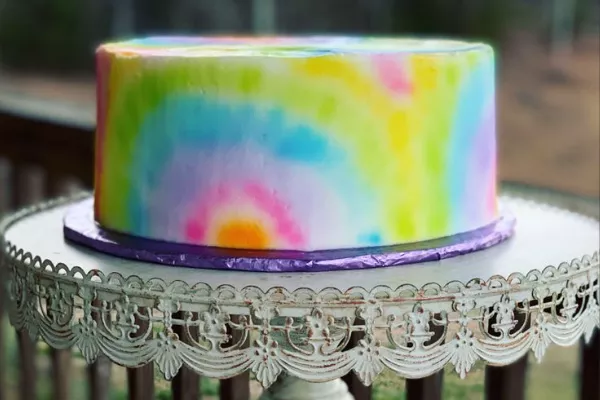
Making a tie dye cake is a fun and creative way to add color and excitement to any celebration. This vibrant dessert is perfect for birthday parties, family gatherings, or even just for a fun weekend baking project. The cake looks impressive, but it’s actually quite easy to make! In this article, we’ll walk through every step in detail to help you create your own colorful tie dye cake.
Ingredients You Will Need
To make a tie dye cake, you’ll need a few basic ingredients. These ingredients come together to form a delicious, moist cake that will hold its vibrant colors beautifully. Here’s what you’ll need:
For the Cake:
- 2 and 1/2 cups of all-purpose flour
- 2 and 1/2 teaspoons of baking powder
- 1/2 teaspoon of salt
- 1 cup of unsalted butter, at room temperature
- 1 and 1/2 cups of granulated sugar
- 4 large eggs, at room temperature
- 1 tablespoon of vanilla extract
- 1 cup of whole milk, at room temperature
For the Tie Dye Colors:
- Food coloring in a variety of colors (at least four colors for the best effect: red, blue, yellow, and green)
- Ziploc bags or piping bags to hold the colored batter
For the Frosting:
- 1 cup of unsalted butter, at room temperature
- 4 cups of powdered sugar
- 2 teaspoons of vanilla extract
- 2-4 tablespoons of whole milk (to reach your desired frosting consistency)
- A pinch of salt
Preparing the Cake Batter
The first step in creating your tie dye cake is to make the cake batter. Follow these steps:
Step 1: Mix the Dry Ingredients
In a large bowl, combine the all-purpose flour, baking powder, and salt. Stir them together with a whisk to ensure that the dry ingredients are evenly distributed. This helps the cake rise evenly and ensures the texture will be perfect.
Step 2: Cream the Butter and Sugar
In another bowl, use a hand mixer or stand mixer to cream the butter and granulated sugar together. Beat them on medium speed for about 3-4 minutes, or until the mixture becomes light and fluffy. This step is crucial for creating a soft, moist cake.
Step 3: Add the Eggs and Vanilla Extract
Add the eggs to the butter-sugar mixture, one at a time. Be sure to mix well after each addition. Once all the eggs are incorporated, add the vanilla extract and continue to mix until fully combined.
Step 4: Add the Dry Ingredients and Milk
Now, alternately add the dry ingredients (flour mixture) and milk to the butter mixture. Start with a small amount of the dry ingredients, followed by a bit of the milk. Continue to alternate until both the dry ingredients and milk are fully incorporated. Mix on low speed to avoid overmixing. This will keep the batter light and fluffy.
Dividing the Batter into Multiple Bowls
Once your batter is ready, you’ll need to divide it into separate bowls to create the colorful tie dye effect.
Step 5: Divide the Batter
Divide the batter equally into several bowls. The number of bowls will depend on how many colors you plan to use for the tie dye effect. For a basic tie dye effect, use four colors. However, you can always add more if you want a more vibrant design.
Step 6: Add Food Coloring
Now comes the fun part – adding the food coloring! Add a few drops of different food coloring to each bowl of batter. Stir each bowl gently to mix the color into the batter. Be careful not to over-mix, as you want the color to be swirled into the batter, not fully blended. Each color should be vibrant and bold.
Preparing the Cake Pans
Before you can start layering your colored cake batter, you’ll need to prepare the cake pans.
Step 7: Grease and Flour the Cake Pans
Grease and flour two 9-inch round cake pans. Alternatively, you can line them with parchment paper for easy removal later. Make sure that the pans are evenly coated to prevent the cake from sticking.
Step 8: Start Layering the Batter
Now, it’s time to assemble your colorful tie dye cake. Using spoons or a spatula, drop large spoonfuls of each colored batter into the center of each cake pan. You can start by adding one color at a time, or you can drop spoonfuls of different colors randomly into the center.
Step 9: Create the Tie Dye Effect
After adding the batter, gently swirl it using a butter knife or skewer. Be careful not to mix the colors too much – you just want to swirl them together for a tie dye effect. The batter should be streaky but not fully combined. Repeat the process for the second cake pan, creating a fun and vibrant tie dye pattern.
Baking the Cake
With the batter in the pans and ready to go, it’s time to bake your cake.
Step 10: Bake the Cake
Preheat your oven to 350°F (175°C). Place the cake pans in the oven and bake for 30-35 minutes, or until a toothpick inserted into the center comes out clean. Keep an eye on the cakes, as baking times can vary slightly depending on your oven.
Once baked, allow the cakes to cool in the pans for about 10 minutes before transferring them to wire racks to cool completely. This cooling process helps prevent the cake from falling apart when you frost it.
Making the Frosting
While the cake is cooling, you can prepare the frosting. A simple buttercream frosting pairs perfectly with a colorful tie dye cake.
Step 11: Make the Buttercream Frosting
In a large bowl, beat the butter with a hand mixer or stand mixer on medium speed until it becomes creamy and smooth. Gradually add the powdered sugar, one cup at a time, mixing well after each addition. Once all the powdered sugar is incorporated, add the vanilla extract, salt, and milk, and continue to beat the frosting until it’s light and fluffy. If the frosting is too thick, add more milk a tablespoon at a time until it reaches your desired consistency.
Assembling the Tie Dye Cake
Once the cakes have cooled completely, it’s time to assemble your tie dye cake.
Step 12: Frost the Cake Layers
Place one of the cake layers on a cake stand or plate. Use a spatula to spread a layer of frosting over the top. Then, carefully place the second cake layer on top. Frost the entire cake with a thin crumb coat – this is a layer of frosting that seals in any crumbs. Chill the cake in the fridge for 20-30 minutes to set the crumb coat.
Step 13: Add the Final Layer of Frosting
Once the crumb coat has set, apply the final layer of frosting to the entire cake. Use a spatula or a piping bag to smooth the frosting over the top and sides of the cake. You can create a smooth finish or go for a more textured, swirled look, depending on your preference.
Decorating the Cake
Now that your cake is frosted and looking beautiful, you can add extra decorations if you like.
Step 14: Add Sprinkles or Edible Glitter (Optional)
For an extra touch, consider adding colorful sprinkles or edible glitter to your tie dye cake. This step is optional, but it adds a fun and festive touch that’s perfect for birthday parties or other celebrations.
Serving the Cake
Once the cake is fully decorated, it’s time to slice and serve!
Step 15: Slice and Enjoy
Use a sharp knife to cut slices of your beautiful tie dye cake. When you slice through the layers, you’ll reveal the stunning rainbow colors inside! This cake is not only delicious but also a visual treat.
Tips for Making the Perfect Tie Dye Cake
Use gel food coloring: Gel food coloring tends to give you more vibrant colors than liquid food coloring, which helps make your tie dye cake even more eye-catching.
Be careful with mixing: When creating the tie dye effect, it’s important to avoid overmixing the colors. You want to maintain the streaky tie dye look, so mix gently.
Don’t skip the crumb coat: The crumb coat helps keep crumbs from ruining your frosting. It also makes the final layer of frosting smoother and more professional-looking.
Chill the cake: After applying the crumb coat, chilling the cake allows the frosting to set, making it easier to decorate.
Conclusion
Making a tie dye cake is a fun and easy way to add a pop of color to any occasion. With just a few basic ingredients, you can create a delicious, colorful masterpiece that will impress your friends and family. Whether you’re celebrating a birthday, hosting a party, or just indulging in a little creative baking, a tie dye cake is sure to be a hit. So, grab your food coloring and get ready to bake a beautiful cake that’s as fun to make as it is to eat!
Related topics