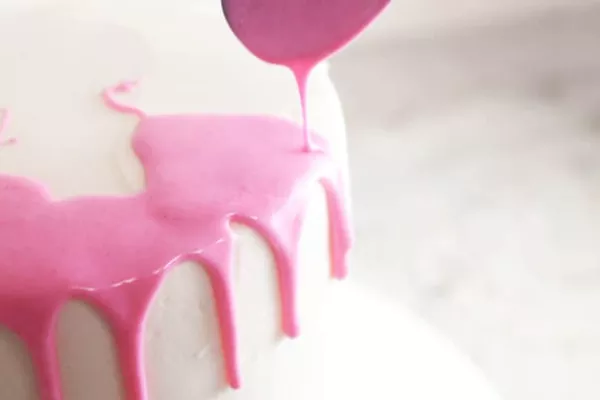
Drip icing is a popular decoration technique used in cake making and cupcakes. It’s known for its beautiful, glossy finish that runs down the sides of a cake or treats, creating an elegant and professional look. The good news is that making drip icing is simpler than it sounds, and with the right ingredients and technique, you can create stunning cakes at home.
In this guide, we’ll take you through everything you need to know to make drip icing from scratch. Whether you’re decorating a birthday cake or simply want to add an artistic touch to your dessert, this article will guide you through the process step by step.
What is Drip Icing?
Drip icing is a decorative technique where a thin layer of icing or ganache is allowed to drip down the sides of a cake or pastry. The drips add a charming and stylish look to the dessert, making it appear more luxurious. Typically, chocolate ganache or colored icing is used, but you can experiment with different flavors and colors to suit your cake’s theme.
Essential Ingredients for Drip Icing
To make drip icing, you will need the following ingredients:
Chocolate: Semi-sweet or dark chocolate is typically used. You can also use milk chocolate for a sweeter, lighter finish.
Heavy Cream: This is used to create a smooth, pourable ganache. The cream helps thin the chocolate to the right consistency for dripping.
Butter (optional): Adding butter to the ganache will give it a richer, glossy finish.
Food Coloring (optional): If you want to create colored drip icing, use food coloring in gel or paste form.
Powdered Sugar (optional): Sometimes, powdered sugar is added to create a thicker icing, but it’s not necessary for traditional ganache.
Step-by-Step Guide: How to Make Drip Icing
Step 1: Gather Your Materials
Before you begin, gather all the ingredients and equipment you need. Make sure your cake is fully chilled and covered with a smooth layer of buttercream or fondant. A chilled cake helps the icing set more quickly and prevents it from running down too fast.
What You’ll Need:
- 1 or 2 cups of semi-sweet chocolate
- 1/2 cup of heavy cream
- 2 tablespoons of butter (optional)
- A heatproof bowl
- A microwave-safe mug or small saucepan
- A spoon or whisk for stirring
- A squeeze bottle or piping bag (optional, for precise drips)
- A small bowl for food coloring (optional)
Step 2: Prepare the Ganache
The most common base for drip icing is a chocolate ganache. Follow these steps to make your ganache:
Chop the Chocolate: Break or chop your chocolate into small, even pieces. This helps it melt more evenly.
Heat the Cream: In a microwave-safe bowl or small saucepan, heat the heavy cream over medium heat until it starts to steam, but not boil.
Combine Cream and Chocolate: Pour the hot cream over the chopped chocolate and let it sit for 1–2 minutes. This will soften the chocolate and help it melt smoothly.
Stir Until Smooth: After the chocolate has softened, stir gently until the ganache is smooth and fully combined. If you want a shiny finish, you can add 1-2 tablespoons of butter. Stir until the butter is completely melted into the ganache.
Step 3: Adjust the Ganache Consistency
The consistency of your ganache is important for achieving the perfect drips. You want the ganache to be thin enough to drip but thick enough to hold its shape once it touches the cake. To adjust:
For a Thicker Drip: Let the ganache cool for about 5-10 minutes to allow it to thicken. The cooler the ganache, the slower and thicker the drips will be.
For a Thinner Drip: If your ganache is too thick, you can add a little more cream, a tablespoon at a time, until you get the desired consistency.
Step 4: Color Your Ganache (Optional)
If you want to add color to your drip icing, this is the time to do so. Use gel food coloring for the best results. Liquid food coloring can affect the consistency of your ganache, so gel is preferred for vibrant, even color.
- Divide the ganache into separate bowls if you want multiple colors.
- Add a small amount of gel food coloring and stir until the color is even. If you need a darker or lighter shade, add more coloring a little at a time.
Step 5: Chill the Ganache (Optional)
If your ganache is too runny and you want thicker drips, place it in the refrigerator for about 15–20 minutes. This will help it cool down and thicken further.
Step 6: Prepare Your Cake
Now, it’s time to prepare your cake. Your cake should be covered with a smooth layer of buttercream or fondant to ensure that the ganache adheres well. If your cake is not already chilled, place it in the fridge for 30 minutes to help set the icing.
Step 7: Apply the Drip Icing
To apply the drip icing, you can either:
Use a Spoon or Ladle: Hold a spoon over the edge of the cake and gently pour the ganache along the edges, letting it drip naturally.
Use a Squeeze Bottle or Piping Bag: If you want more control over the drips, fill a squeeze bottle or piping bag with ganache. Hold the bottle or bag just above the edge of the cake and squeeze the ganache to create drips.
To achieve the most attractive look, pour the ganache from the top edge of the cake and let it run down in a natural drip pattern. You can also drizzle the top of the cake with ganache for a smooth finish.
Step 8: Let the Drip Icing Set
After you’ve applied the ganache, place the cake in the refrigerator for 15-30 minutes to allow the drip icing to set. This ensures that the ganache hardens and stays in place.
Step 9: Add Final Touches
Once the drip icing has set, you can add any additional decorations, such as:
- Fresh fruit
- Sprinkles
- Edible glitter
- Chocolate shavings or chips
- Flowers or edible gold leaf
These final touches will complement your drip icing and elevate your cake’s appearance.
Tips for Perfect Drip Icing
Consistency is Key: The key to perfect drip icing is the consistency of the ganache. If it’s too runny, it will drip too quickly. If it’s too thick, it won’t drip at all.
Chill Your Cake: A cold cake helps the ganache to set faster and prevents it from running too far down the sides.
Test First: Before applying the ganache to the whole cake, do a small test drip on the side of the cake to ensure that it’s the right consistency.
Don’t Overload: If you use too much ganache, it can overpower the cake. Apply a thin layer and build up if necessary.
How to Store Drip Icing Cakes
If you’re not serving your cake right away, you can store it to keep the drip icing intact. Here’s how:
In the Refrigerator: Store your decorated cake in an airtight container in the refrigerator. Drip icing cakes should be kept chilled to maintain their texture and appearance. However, if you’re using butter-based ganache, be aware that it can harden when refrigerated.
At Room Temperature: If you plan to serve the cake within a few hours, you can leave it at room temperature. Just make sure it’s not too warm, as this can cause the ganache to soften and lose its drip appearance.
Alternative Drip Icing Variations
While chocolate ganache is the most common type of drip icing, you can experiment with different flavors and textures. Here are a few alternatives:
White Chocolate Ganache: Made with white chocolate instead of dark or milk chocolate, this version is creamy and has a lighter color.
Colored Buttercream Drips: If you prefer a buttercream-based icing, you can make a thinner buttercream drip by adding a bit of milk or cream to regular buttercream.
Caramel Drips: For a different flavor, you can make a caramel sauce using brown sugar, butter, and cream, which can be drizzled on your cake for a rich, sweet look.
Conclusion
Making drip icing is a fun and easy way to add an elegant touch to your cakes and cupcakes. With just a few simple ingredients like chocolate, cream, and butter, you can create beautiful, glossy drips that will impress anyone. Whether you’re making a celebration cake or just experimenting with new techniques, drip icing is an accessible and rewarding decoration method for bakers of all skill levels.
Now that you know how to make drip icing, go ahead and try it out on your next cake creation! With a little practice, you’ll be able to create professional-looking desserts with ease.
Related topics