Making snowman cocoa bombs is a fun and creative way to enjoy hot chocolate during the winter months. These adorable, festive treats are a perfect addition to your holiday celebrations, whether you’re making them for yourself, as gifts, or to share with loved ones. The cocoa bomb melts into a mug of hot milk, releasing rich chocolate and marshmallows, creating a delicious, warming experience. In this article, we will guide you through the step-by-step process of making your own snowman cocoa bombs, so you can enjoy the magic of the season in every sip.
Ingredients for Snowman Cocoa Bombs
To make these snowman cocoa bombs, you will need the following ingredients:
White chocolate or white chocolate chips: This will serve as the base of the snowman’s body. You can use a good-quality white chocolate bar or white chocolate chips for melting.
Hot cocoa mix: You’ll need one packet of hot cocoa mix for each cocoa bomb. You can use your favorite brand or make your own if you prefer.
Mini marshmallows: These will be used inside the cocoa bomb to give your hot chocolate a fluffy and fun texture.
Melted dark or milk chocolate: This will be used for decorating the snowman’s face and buttons.
Candy eyes: Small, edible candy eyes are perfect for making your snowman’s face.
Orange candy or icing: This will be used to create the snowman’s carrot nose.
Sprinkles or edible glitter: These will add a festive touch to your snowman cocoa bombs.
A silicone cocoa bomb mold: This is essential for shaping the snowman’s body.
You may also need some kitchen tools like a spoon, a microwave-safe bowl, and a small piping bag or plastic sandwich bag for decorating.
Step 1: Prepare Your Work Area
Before starting, ensure that your workspace is clean and organized. Gather all the ingredients and tools, so everything is within reach. It’s best to work on a flat surface like a countertop or a table. You’ll also want to have some parchment paper or a clean kitchen towel handy to catch any spills.
Step 2: Melt the White Chocolate
Start by melting the white chocolate. You can use either a microwave or a double boiler for this process.
Microwave method: Place the white chocolate in a microwave-safe bowl. Heat it in 20-30 second intervals, stirring in between each interval. Continue until the chocolate is fully melted and smooth.
Double boiler method: Fill a pot with a small amount of water and bring it to a simmer. Place a heatproof bowl on top of the pot, making sure the bowl does not touch the water. Add the white chocolate to the bowl and stir occasionally until it is completely melted.
Once the chocolate is melted, allow it to cool slightly before using it in the molds.
Step 3: Prepare the Cocoa Bomb Molds
Next, you’ll need a silicone mold to shape the cocoa bombs. A round sphere-shaped mold works best, but if you want a more snowman-like appearance, you can use a slightly larger mold for the body and a smaller mold for the head.
Lightly grease the mold with a small amount of vegetable oil or non-stick spray. This will help the chocolate come out easily later.
Using a spoon or a small ladle, carefully pour the melted white chocolate into each mold, filling it about halfway.
Use the back of a spoon to spread the chocolate evenly around the sides of the mold. This will create a solid shell that holds the cocoa mix and marshmallows. Be sure to cover the entire inside of the mold with a thin layer of chocolate, making sure there are no gaps.
Step 4: Let the Chocolate Set
Allow the white chocolate to set by placing the mold in the refrigerator for 10-15 minutes. The chocolate should harden and form a solid shell. Once it’s firm, carefully remove the mold from the refrigerator.
Gently tap the mold on the countertop to release the chocolate spheres.
If any pieces break or crack, don’t worry! You can always patch them up with more melted chocolate later.
Step 5: Add the Hot Cocoa Mix and Marshmallows
Now that you have your cocoa bomb shells, it’s time to fill them.
Take one of the chocolate shells and add one packet of hot cocoa mix inside.
Add a small handful of mini marshmallows on top of the cocoa mix. You want enough marshmallows to create a cute, snowman-like effect when the cocoa bomb is dropped into hot milk.
Gently press the second chocolate shell onto the filled shell to form a ball. Use your fingers to lightly press the edges together.
If the two halves of the cocoa bomb don’t stick together perfectly, you can melt a little more chocolate and use it as “glue” to seal the edges. Simply dip your finger in the melted chocolate and run it along the seam where the two halves meet. Press them gently together to form a solid ball.
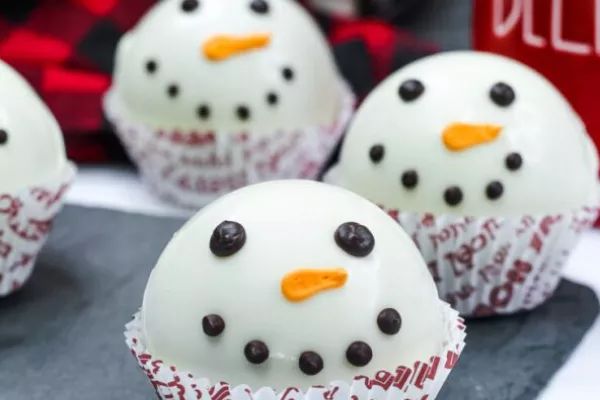
Step 6: Decorate the Snowman Cocoa Bombs
Now comes the fun part: decorating your snowman cocoa bombs!
Create the snowman’s face: Melt a small amount of dark or milk chocolate. You can do this in the same way as the white chocolate, using a microwave or double boiler. Once melted, use a piping bag or a small sandwich bag with the tip cut off to pipe the eyes and buttons onto the cocoa bomb.
Add the nose: For the snowman’s carrot nose, you can either use an orange candy (like an orange-colored Jelly Belly) or pipe orange icing onto the cocoa bomb in the shape of a small carrot.
Add sprinkles or glitter: To make your snowman extra festive, add some edible glitter or colorful sprinkles around the cocoa bomb. This will give it a shiny, snowy look and make it stand out as a holiday treat.
Optional scarf: If you want to add a scarf to your snowman, you can use a small piece of ribbon or fondant to wrap around the “neck” of the cocoa bomb. This will give your snowman extra charm.
Step 7: Let the Decorations Set
Allow the cocoa bomb to sit at room temperature for a few minutes so that the decorations can harden. This step ensures that everything stays in place when you serve or gift the cocoa bombs.
Step 8: Enjoy Your Snowman Cocoa Bombs
Now that your snowman cocoa bombs are complete, it’s time to enjoy them!
To make your hot cocoa, simply place one of the snowman cocoa bombs in a mug. Heat up a cup of milk (about 8 oz) in the microwave or on the stove. Pour the hot milk over the cocoa bomb, and watch as it melts, releasing the cocoa mix and marshmallows into the milk. Stir well, and enjoy your warm, delicious snowman hot chocolate!
These snowman cocoa bombs also make great gifts. You can wrap them up in clear plastic bags or boxes, tie them with a festive ribbon, and present them to family and friends during the holiday season.
Tips for Perfect Snowman Cocoa Bombs
Use good-quality chocolate: The quality of your chocolate will greatly affect the taste and texture of your cocoa bombs. Opt for high-quality white chocolate and dark chocolate for the best flavor.
Customize the fillings: If you prefer, you can add extra treats inside your cocoa bombs. For example, crushed candy canes, chocolate chips, or even flavored hot cocoa mixes are great alternatives to the standard mix.
Add flavorings: For a twist on the classic cocoa bomb, try adding a few drops of peppermint extract or vanilla extract to the melted white chocolate for extra flavor.
Storage: Store your snowman cocoa bombs in an airtight container at room temperature for up to a week. If you plan to keep them for a longer period, consider storing them in the fridge.
Conclusion
Making snowman cocoa bombs is a delightful and simple way to bring some winter magic to your home. These sweet treats not only make great holiday gifts but are also an exciting way to enjoy hot chocolate with loved ones. Whether you’re making them for a cozy night in or as a festive gift, snowman cocoa bombs are sure to bring smiles and warmth to any occasion. With a little creativity and a few simple ingredients, you can make your own adorable snowman cocoa bombs that everyone will love.
Related topics


