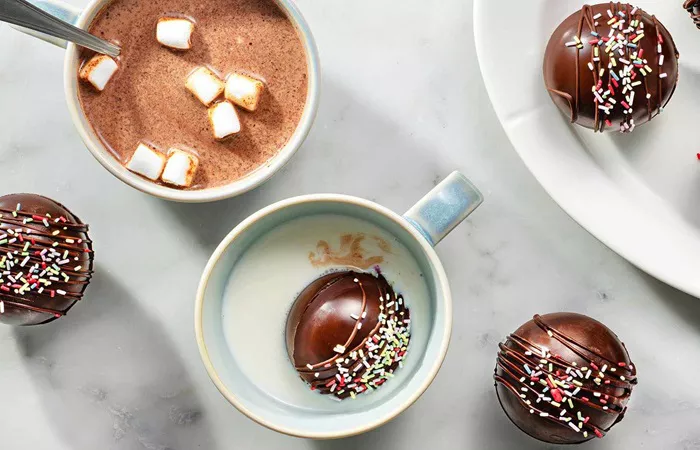
Hot cocoa bombs have taken the world by storm in recent years. These delightful, chocolatey orbs filled with marshmallows, hot cocoa mix, and other treats have become a fun, interactive way to enjoy hot chocolate. The excitement of watching the cocoa bomb dissolve in hot milk, releasing a flood of sweet ingredients, brings an element of surprise and joy to the experience. Whether you’re making them for yourself, as a gift, or for a cozy holiday treat, hot cocoa bombs are an indulgent and entertaining way to enjoy a classic drink.
While the contents of hot cocoa bombs are what people focus on initially, the appearance of the cocoa bomb is just as important, especially if you’re gifting them or showcasing them at a special event. A smooth, shiny finish adds a level of sophistication and luxury to the cocoa bomb, making it even more tempting to break open.
In this article, we will teach you how to make your hot cocoa bombs shiny and visually appealing. By following a few simple steps and using the right techniques, you can ensure that your cocoa bombs not only taste delicious but look professional and glossy. Let’s dive into the world of cocoa bomb perfection!
Why Shiny Cocoa Bombs Matter
Before we dive into the techniques, let’s understand why you should strive for shiny hot cocoa bombs. The shine isn’t just about aesthetics—it’s also about the quality of the chocolate used and the technique behind coating it. A shiny cocoa bomb is often a sign of a well-tempered chocolate coating, which results in a smoother, more appealing texture. When done correctly, the shine enhances the experience of the cocoa bomb, making it even more exciting to break into.
In addition to looking beautiful, a shiny surface also helps with the cocoa bomb’s shelf life. Chocolate that has been properly tempered and polished will have a firmer texture and will hold its shape longer, ensuring your cocoa bombs stay intact, even when stored for a while.
Key Ingredients for Shiny Cocoa Bombs
To achieve a shiny, professional-looking cocoa bomb, the right ingredients are essential. Here’s a breakdown of the key elements:
1. High-Quality Chocolate
The star of the show is the chocolate. To get a glossy finish, you need to use high-quality chocolate that has a high cocoa butter content. Chocolate chips or bars designed for baking or tempering are your best bet. Avoid using candy melts or cheap chocolates, as they do not temper well and won’t provide the shiny, smooth finish you’re aiming for.
2. Cocoa Powder and Sugar
For the filling inside the cocoa bomb, you can use your favorite hot cocoa mix, which typically contains cocoa powder and sugar. You can even make your own mix if you prefer. The goal is to have a rich and flavorful filling that complements the smooth, shiny exterior.
3. Marshmallows and Other Add-ins
Mini marshmallows are a popular filling choice, but you can also get creative with other add-ins, such as chocolate chips, crushed candy canes, or sprinkles. These little surprises inside the cocoa bomb make it even more fun and exciting when it dissolves in your hot milk.
4. Tempering Equipment
To achieve a shiny finish, you must temper the chocolate properly. Tempering is a process of melting and cooling chocolate to specific temperatures, allowing the cocoa butter to crystalize in a way that produces a smooth, glossy finish. You’ll need a thermometer, and optionally, a microwave or double boiler to melt the chocolate.
Step-by-Step Guide to Making Shiny Hot Cocoa Bombs
Now that we know the importance of the right ingredients and equipment, let’s go through the step-by-step process for making shiny hot cocoa bombs. With a little patience and attention to detail, you’ll be able to create cocoa bombs that look just as good as they taste.
Step 1: Choose Your Chocolate
The first step in making shiny cocoa bombs is to select the right chocolate. As mentioned earlier, high-quality chocolate is crucial for getting that glossy finish. Use couverture chocolate or baking chocolate with a high cocoa butter content. Dark, milk, or white chocolate all work well, so choose according to your personal preference.
Once you’ve selected your chocolate, chop it into small, uniform pieces. This will help it melt evenly and make the tempering process easier.
Step 2: Temper the Chocolate
Tempering chocolate is the key to achieving that glossy, smooth finish. When chocolate is tempered correctly, the cocoa butter in the chocolate forms stable crystals, which give it the desired texture and shine. Here’s how to temper chocolate using a simple method:
Melt the Chocolate:
Heat 2/3 of your chopped chocolate in a heatproof bowl using a double boiler or microwave. If you’re using the microwave, heat in 20-second intervals, stirring in between. This helps prevent overheating.
The goal is to melt the chocolate to a temperature of 110-115°F (43-46°C) for dark chocolate, or 105-110°F (40-43°C) for milk or white chocolate.
Cool the Chocolate:
Once your chocolate has reached the desired temperature, remove it from the heat and gradually add the remaining 1/3 of chopped chocolate to the bowl. Stir the chocolate constantly to help cool it down.
Continue stirring until the chocolate cools to around 88-90°F (31-32°C) for dark chocolate, or 86-88°F (30-31°C) for milk and white chocolate.
Test the Tempering:
To check if the chocolate is properly tempered, dip a spoon into the chocolate and allow it to cool at room temperature. If the chocolate hardens quickly and becomes glossy, it’s properly tempered.
Step 3: Coat the Cocoa Bomb Molds
Once your chocolate is tempered and ready, it’s time to coat the molds for your cocoa bombs.
Prepare the Mold:
You can use silicone cocoa bomb molds, which are readily available online and in specialty stores. Make sure the molds are clean and dry before you start.
Fill the Molds:
Using a spoon or pastry brush, carefully coat the inside of the molds with the tempered chocolate. Ensure that you coat every part of the mold evenly. If necessary, you can rotate the mold to ensure the chocolate is distributed evenly along the edges.
Allow the first layer to set for a few minutes at room temperature, then repeat the process with a second layer to create a thicker, more durable shell.
Set the Coating:
Once you’ve applied two layers of chocolate, place the mold in the refrigerator for 10-15 minutes to allow the chocolate to firm up.
Step 4: Remove the Cocoa Bombs from the Molds
After the chocolate has set and hardened, it’s time to remove the cocoa bombs from the molds. Carefully peel the silicone mold away from the chocolate, gently pressing around the edges to release the cocoa bomb. Be cautious not to crack the shell.
Step 5: Fill the Cocoa Bombs
Once you’ve removed the cocoa bomb shells from the molds, it’s time to fill them with your delicious hot cocoa mix.
Prepare the Filling:
Spoon hot cocoa mix into one half of the cocoa bomb. You can also add mini marshmallows, chocolate chips, or any other fun ingredients you’d like to include.
Seal the Cocoa Bombs:
Warm a plate in the microwave or on the stovetop. Place the empty half of the cocoa bomb face down onto the plate for a few seconds. This will slightly melt the edges, allowing the two halves to bond together.
Gently press the two halves together to seal the cocoa bomb. If you need to, use some extra tempered chocolate to fill in any gaps and ensure a tight seal.
Step 6: Polish the Cocoa Bombs for Extra Shine
Now that your cocoa bombs are filled and sealed, you can give them a final touch of shine. To do this:
Heat a Knife:
Heat a knife or metal spatula by running it under hot water or warming it in the microwave for a few seconds. Wipe it dry with a clean towel.
Polish the Surface:
Gently run the heated knife or spatula around the edges and surface of the cocoa bomb to smooth out any imperfections. This will give the cocoa bomb a beautiful, shiny finish.
Step 7: Enjoy and Share
Once your cocoa bombs are shiny and perfect, they’re ready to be enjoyed! Drop one into a mug of hot milk, watch it dissolve, and enjoy the delicious hot cocoa that awaits inside. You can also package them in clear gift bags or boxes for a thoughtful, homemade gift.
Tips for Extra Shine
Avoid Humidity: Humidity can affect the tempering process and cause the chocolate to lose its shine. Try to work in a dry environment.
Store Properly: Store the finished cocoa bombs in an airtight container at room temperature to preserve the shine and prevent them from melting or losing their shape.
Use a Fine Layer: Don’t apply a thick layer of chocolate in the molds—thin layers tend to harden more quickly and evenly, resulting in a smooth and glossy finish.
Conclusion
Making shiny hot cocoa bombs may seem like a daunting task, but with a little practice and the right techniques, you can create beautiful, glossy cocoa bombs that will impress your friends and family. By following the steps outlined in this guide—particularly the tempering process—you can achieve a smooth, shiny finish that enhances both the appearance and taste of your cocoa bombs. So, gather your ingredients, put on your apron, and start making these delectable treats today!
Related topics: