Cocoa bombs have taken the dessert world by storm. They are fun, interactive, and delicious treats that bring a little magic to your hot chocolate experience. In this article, we will guide you step by step on how to make cocoa bombs at home. Let’s dive in!
What is a Cocoa Bomb?
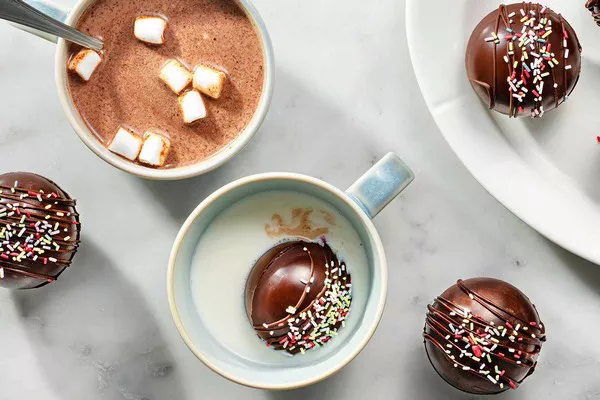
A cocoa bomb is a hollow chocolate shell filled with hot cocoa mix, marshmallows, and sometimes other fun toppings like candy or flavored powders. When you drop a cocoa bomb into hot milk or water, it melts, releasing the cocoa mix and marshmallows into your drink.
Why Make Cocoa Bombs?
Interactive Treats: Making and using cocoa bombs is an interactive experience. Kids and adults alike enjoy watching the magic unfold.
Customizable: You can personalize the flavors and fillings to suit your taste. Add your favorite toppings or flavors for a unique twist.
Perfect for Gifting: Cocoa bombs make great gifts. You can package them beautifully for holidays or special occasions.
Ingredients You Will Need
For the Chocolate Shell:
Chocolate: You can use milk chocolate, dark chocolate, or white chocolate. Choose high-quality chocolate for the best results.
Cocoa Powder: Optional, for added chocolate flavor.
For the Filling:
Hot Cocoa Mix: You can use store-bought or make your own.
Marshmallows: Mini marshmallows work best, but you can also use large marshmallows cut into smaller pieces.
Flavor Add-ins: Consider crushed candy canes, chocolate chips, or flavored powders (like caramel or hazelnut) for extra flavor.
Tools You Will Need
Silicone Mold: A sphere-shaped silicone mold works best for making cocoa bombs.
Microwave-Safe Bowl: For melting the chocolate.
Spoon or Pastry Brush: For spreading the chocolate.
Hot Plate or Microwave: For heating the milk or water when you’re ready to enjoy your cocoa bomb.
Step-by-Step Instructions for Making Cocoa Bombs
Step 1: Prepare Your Workstation
Before you start, make sure your workspace is clean and organized. Gather all your ingredients and tools. This will make the process smoother and more enjoyable.
Step 2: Melt the Chocolate
Chop the Chocolate: If you’re using chocolate bars, chop them into small, even pieces. This helps them melt evenly.
Melt the Chocolate: Place the chocolate in a microwave-safe bowl. Microwave in short intervals (about 20-30 seconds), stirring between each interval until completely melted. Be careful not to overheat the chocolate; it should be smooth and shiny.
Step 3: Coat the Mold
Add Chocolate to the Mold: Use a spoon or a pastry brush to coat the inside of each cavity of your silicone mold with melted chocolate. Ensure the coating is even and thick enough to hold its shape.
Chill the Mold: Place the coated mold in the refrigerator for about 10-15 minutes, or until the chocolate is set.
Step 4: Add a Second Layer of Chocolate
Check the Shell: Once the first layer is set, check if it’s thick enough. If not, add another layer of melted chocolate.
Chill Again: Return the mold to the fridge for another 10-15 minutes to set the second layer.
Step 5: Remove the Shells from the Mold
Carefully Pop Them Out: Once the chocolate is fully set, gently push from the bottom of the silicone mold to release the chocolate shells. Be careful not to break them.
Check for Cracks: Inspect each shell for any cracks. If there are any, you can repair them later.
Step 6: Fill the Cocoa Bombs
Fill with Cocoa Mix: Take one half of the chocolate shell and spoon in a generous amount of hot cocoa mix.
Add Marshmallows: Add a handful of mini marshmallows on top of the cocoa mix.
Add Extras: If you’re using any extra toppings or flavor add-ins, now is the time to sprinkle those in.
Step 7: Seal the Cocoa Bombs
Heat a Plate: Take a plate and warm it in the microwave for about 30 seconds. This will be used to seal the cocoa bombs.
Melt the Edges: Take an empty chocolate half and place it on the warm plate for a few seconds. This will slightly melt the edge.
Join the Halves: Quickly press the melted edge onto the filled half to seal the cocoa bomb. Hold it in place for a few seconds to ensure a good seal.
Repeat: Repeat this process with the remaining shells.
Step 8: Decorate (Optional)
Melt More Chocolate: If desired, melt more chocolate to drizzle on top of the cocoa bombs for decoration.
Add Sprinkles: While the chocolate is still wet, add sprinkles or other decorative toppings.
Let It Set: Allow the decorations to harden.
How to Use Cocoa Bombs
Heat Your Milk or Water: Boil water or heat milk in a pot or microwave. For the best taste, use milk.
Drop the Cocoa Bomb: Place the cocoa bomb in your mug.
Pour Hot Liquid: Slowly pour the hot milk or water over the cocoa bomb.
Watch the Magic: Enjoy the show as the bomb melts, releasing the cocoa mix and marshmallows.
Stir and Enjoy: Give your drink a good stir to mix everything together, and enjoy!
Tips for Perfect Cocoa Bombs
Use Quality Chocolate: The better the chocolate, the better the taste.
Don’t Rush the Melting: Be patient while melting chocolate. Overheating can lead to a grainy texture.
Experiment with Flavors: Try different cocoa mixes, toppings, and flavorings to find your favorite combination.
Store Properly: If you’re not using the cocoa bombs immediately, store them in an airtight container at room temperature. They can last for several weeks.
Common Mistakes to Avoid
Too Thin Chocolate Layers: Ensure your chocolate layers are thick enough to hold their shape. If they’re too thin, they might break.
Not Sealing Properly: Make sure to seal the halves well; otherwise, the cocoa mix can spill out when you drop it into the liquid.
Using Cold Milk: Always use hot milk or water to get the best melting effect.
Conclusion
Cocoa bombs are a fun and delicious treat that anyone can make at home. They are perfect for cozy nights in, gatherings with friends, or as thoughtful gifts. By following this detailed guide, you can create beautiful and tasty cocoa bombs that will impress everyone. Enjoy the process, experiment with flavors, and savor the delightful results!
Related topics:


