Cocoa spoons are a delightful treat that can turn an ordinary cup of hot milk or coffee into a rich, flavorful experience. These simple yet indulgent creations are made by coating a spoon with chocolate and adding cocoa powder and other toppings for extra flavor. They are perfect for gift-giving, holiday parties, or simply enjoying a cozy moment. In this guide, we will walk you through every step of making cocoa spoons at home.
What Are Cocoa Spoons?
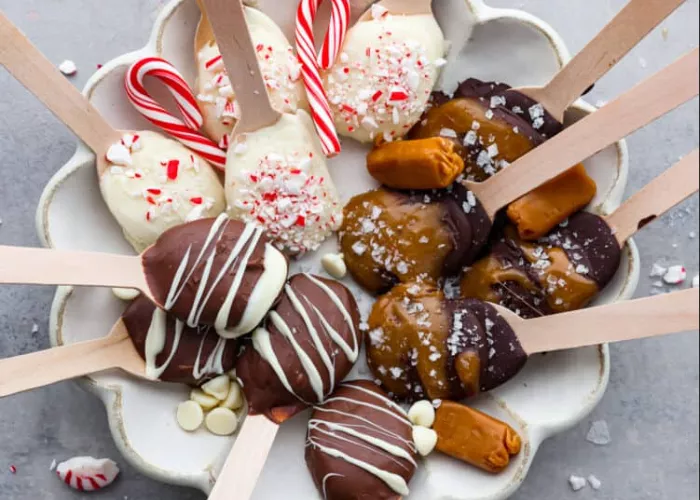
Cocoa spoons are wooden or plastic spoons that are dipped in melted chocolate and then sprinkled with cocoa powder, mini marshmallows, or other toppings. Once the spoon is ready, you can use it to stir into hot milk or coffee, instantly transforming the liquid into a creamy and chocolatey beverage. The beauty of cocoa spoons is their versatility. You can customize the flavor by adding different types of chocolate, sweeteners, or toppings, making them a fun and creative addition to your kitchen.
Why Make Cocoa Spoons?
Making cocoa spoons at home allows you to control the ingredients and create a personalized touch. These treats are inexpensive, easy to make, and the perfect way to indulge in a chocolatey treat. If you’re a fan of cocoa-based beverages, cocoa spoons will take your drinks to the next level. They also make a great homemade gift, as they are unique and thoughtful. Whether you’re making them for yourself or as gifts, cocoa spoons are an enjoyable and customizable treat.
Ingredients Needed for Cocoa Spoons
Before you begin, gather all the ingredients you will need to make your cocoa spoons. You can always customize this list based on your preferences, but here are the basic ingredients:
Chocolate (Milk, Dark, or White Chocolate): This will be the main coating for the spoon. You can choose the type of chocolate based on your preference for sweetness or richness.
Cocoa Powder: To add extra cocoa flavor, you’ll mix this into the chocolate or sprinkle it over the top of the spoon.
Mini Marshmallows: A classic topping for cocoa spoons. Marshmallows melt perfectly into hot milk or coffee and add sweetness and texture.
Wooden or Plastic Spoons: Choose the spoons you prefer for the project. Wooden spoons are most common, but plastic spoons can also work.
Sprinkles or Crushed Candy (optional): These can be added for extra flavor or color.
Sea Salt (optional): A small sprinkle of sea salt can balance the sweetness and enhance the flavor of the chocolate.
Flavoring (optional): You can also add extracts like vanilla, almond, or peppermint for extra flavor.
Equipment Needed
Here is a list of tools you will need to make cocoa spoons:
Heatproof Bowl: To melt the chocolate.
Microwave or Double Boiler: To melt the chocolate.
Baking Sheet or Tray: For placing the spoons as they cool.
Parchment Paper: To prevent the cocoa spoons from sticking to the tray.
Spoons: For stirring the melted chocolate and other toppings.
How To Make Cocoa Spoons
Follow these simple steps to make your own cocoa spoons at home. It’s an easy process, and you’ll have delicious cocoa spoons ready in no time!
Step 1: Prepare the Chocolate
The first step in making cocoa spoons is to melt the chocolate. You can use any type of chocolate that you like—milk chocolate for a creamy, sweet flavor, dark chocolate for a richer taste, or white chocolate for a smooth, vanilla-like finish.
To melt the chocolate:
Microwave Method: Chop the chocolate into small pieces and place them in a heatproof bowl. Microwave in 20-second intervals, stirring after each interval to ensure the chocolate melts evenly. Continue this process until the chocolate is fully melted and smooth.
Double Boiler Method: If you prefer, you can use a double boiler. Fill a saucepan with a little water and bring it to a simmer. Place a heatproof bowl on top, making sure it doesn’t touch the water. Add the chopped chocolate to the bowl and stir occasionally until the chocolate is melted.
Step 2: Prepare the Spoons
While your chocolate is melting, prepare your wooden or plastic spoons. Lay them out on a tray lined with parchment paper. This will make it easier to transfer the cocoa spoons later without making a mess.
Step 3: Dip the Spoons in Chocolate
Once the chocolate is fully melted and smooth, dip the tip of each spoon into the chocolate. Hold the spoon by the handle and carefully swirl the tip into the melted chocolate, coating it evenly. You can dip the spoon as far as you like into the chocolate, depending on how much chocolate you want on the spoon.
You can also tilt the spoon slightly to create a nice chocolate coating along the sides, but be careful not to overdo it. The idea is to cover the end of the spoon where it will stir into your drink.
Step 4: Add Cocoa Powder
After dipping the spoons in chocolate, you can mix cocoa powder into the chocolate to intensify the chocolate flavor. If you want an extra chocolatey spoon, sprinkle cocoa powder directly over the melted chocolate on the spoon. Alternatively, you can mix the cocoa powder into the melted chocolate before dipping the spoon. Stir the cocoa powder in thoroughly for an even distribution.
Step 5: Add Toppings
While the chocolate is still soft, you can add mini marshmallows, sprinkles, crushed candy, or other toppings to the spoon. These toppings will melt and blend into your hot beverage, creating a delicious and fun treat.
You can also choose to sprinkle a tiny pinch of sea salt on top to enhance the chocolate flavor. If you want to add a flavored touch, such as vanilla or peppermint, this is the perfect time to add a drop of your chosen extract.
Step 6: Let the Cocoa Spoons Set
Once your spoons are dipped and topped with cocoa powder and any extras, place them on the parchment paper-lined tray. Allow the cocoa spoons to cool and harden at room temperature. This process can take about 30 minutes to 1 hour, depending on the temperature of your kitchen.
If you’re in a hurry, you can place the tray in the refrigerator for 15-20 minutes to speed up the setting process. However, be mindful not to rush this step as the chocolate can lose its shine if it’s chilled too quickly.
Step 7: Package or Store the Cocoa Spoons
Once the cocoa spoons are completely set, you can package them as gifts or store them for later use. Wrap each spoon individually in plastic wrap or place them in small gift bags. They also make a great addition to holiday baskets or gift boxes.
If you’re keeping them for personal use, store the cocoa spoons in an airtight container at room temperature. They will stay fresh for up to a week. If you want to extend their shelf life, you can refrigerate them, but keep in mind that this can affect the texture of the chocolate.
Tips for Perfect Cocoa Spoons
Use High-Quality Chocolate: The quality of chocolate you use will directly affect the flavor of your cocoa spoons. Choose a good-quality chocolate for the best taste.
Customize Your Cocoa Spoons: Don’t be afraid to experiment with different toppings like crushed nuts, caramel drizzle, or flavored extracts. You can even dip the spoons in white chocolate and drizzle dark chocolate over the top for a beautiful contrast.
Use Smaller Spoons: If you prefer, use smaller spoons for a more delicate serving size.
Get Creative with Presentation: Decorate the spoons with fun and festive decorations, especially if you’re gifting them. Tie a ribbon around the handle or add personalized tags.
Make a Hot Chocolate Station: Set up a hot chocolate bar with different cocoa spoons, toppings, and flavored syrups so everyone can create their own customized hot drink.
Conclusion
Making cocoa spoons is a simple yet rewarding activity that allows you to enjoy a fun, chocolatey treat in the comfort of your own home. Whether you’re stirring them into hot milk for a cozy moment or gifting them to friends and family, cocoa spoons are a delightful and customizable way to enjoy a warm drink. With just a few basic ingredients and some creativity, you can make your own batch of delicious cocoa spoons to elevate your hot beverages and share the joy of chocolate with others.
Related Topics:


