Chocolate pudding is a classic and beloved dessert that has been satisfying sweet cravings for generations. Its rich, creamy texture and indulgent chocolate flavor make it a favorite among people of all ages. Whether you’re looking to whip up a quick and easy treat for your family or aiming to impress guests at a dinner party, making chocolate pudding from scratch is a rewarding and delicious endeavor. In this comprehensive article, we’ll take you through every single step of preparing chocolate pudding, from gathering the essential ingredients and tools to mastering the cooking process, troubleshooting common issues, and even exploring creative variations to customize your pudding to perfection.
Step 1: Preparing the Ingredients
Chopping the Chocolate: If you’re using chocolate bars, take your chosen chocolate (about 4 to 6 ounces or 115 to 170 grams) and place it on a cutting board. Use a sharp knife to chop it into small, uniform pieces. The smaller the pieces, the quicker and more evenly they’ll melt when added to the milk. If you’re using chocolate chips, make sure they’re of good quality and simply measure out the appropriate amount.
Measuring the Dry Ingredients: In a separate small bowl, measure out the sugar (about 1/2 to 3/4 cup or 100 to 150 grams), cornstarch (about 1/4 to 1/2 cup or 30 to 60 grams), and salt (about 1/4 to 1/2 teaspoon). Use measuring spoons for the salt and measuring cups for the sugar and cornstarch. Stir these dry ingredients together gently with a fork or a small whisk to combine them evenly.
Preparing the Milk: Pour the total amount of milk you’ll need (about 2 to 3 cups or 475 to 710 milliliters) into a liquid measuring cup. Set aside about 1/2 cup (about 120 milliliters) of this milk in a separate small bowl. If using eggs, make sure they’re at room temperature. If you only need the yolks, separate them from the whites carefully, placing the yolks in a small dish and reserving the whites for another use if desired.
Step 2: Mixing the Cornstarch with Milk
In the Small Bowl: Take the reserved 1/2 cup (about 120 milliliters) of milk and pour it into the medium-sized mixing bowl. Slowly add the measured cornstarch (about 1/4 to 1/2 cup or 30 to 60 grams) while whisking constantly. Use a whisk to blend the cornstarch and milk together until you have a smooth, lump-free mixture. This step is crucial as any lumps of cornstarch that remain can result in a lumpy pudding later. Make sure to whisk vigorously and thoroughly to incorporate all the cornstarch.
Step 3: Combining the Ingredients in the Saucepan
Adding the Chocolate, Sugar, and Salt: Pour the remaining milk (about 1 1/2 to 2 1/2 cups or 355 to 590 milliliters) into the medium-sized saucepan. Place the saucepan on the stove over medium heat. Add the chopped chocolate (about 4 to 6 ounces or 115 to 170 grams), the measured sugar (about 1/2 to 3/4 cup or 100 to 150 grams), and the pinch of salt (about 1/4 to 1/2 teaspoon) to the milk in the saucepan. Stir constantly with the whisk as the chocolate starts to melt and the mixture heats up. The heat will help the chocolate dissolve evenly and blend with the other ingredients.
Incorporating the Cornstarch-Milk Mixture: Once the chocolate has mostly melted and the mixture in the saucepan is warm, slowly pour in the cornstarch-milk mixture that you prepared earlier. Continue to whisk constantly as you add it to ensure that it blends smoothly with the rest of the ingredients. This step is important to prevent lumps from forming in the pudding as the cornstarch thickens when heated.
Step 4: Cooking the Pudding
Bringing to a Boil: Keep the saucepan over medium heat and continue to whisk the pudding mixture constantly. As it heats up, you’ll notice the mixture start to thicken. Keep whisking until it comes to a gentle boil. A gentle boil is indicated by small bubbles breaking the surface of the mixture all over, not a rapid, rolling boil. It’s important to watch it closely at this stage as it can boil over quickly if you’re not careful.
Cooking for the Right Time: Once the pudding reaches a gentle boil, continue to cook it for an additional 1 to 2 minutes while still whisking constantly. This extra cooking time helps fully activate the thickening power of the cornstarch and ensures that the pudding reaches the right consistency. The pudding should coat the back of a spoon thickly when you dip it in and run your finger through the coating; it should leave a clear path that doesn’t immediately fill in.
Optional: Adding Eggs (if using): If you’ve decided to include eggs in your pudding for added richness, this is the time to add them. In a separate small bowl, whisk the eggs (1 to 2 yolks or whole eggs, depending on your recipe) until they’re well combined. Slowly pour a small amount of the hot pudding mixture into the beaten eggs while whisking constantly. This is called tempering the eggs and helps prevent them from curdling when added to the hot pudding. Then, pour the egg mixture back into the saucepan with the rest of the pudding and continue to whisk constantly over low heat for another minute or two until the pudding thickens further and the eggs are fully incorporated.
Step 5: Finishing the Pudding
Adding Butter and Vanilla Extract (Optional): Once the pudding has cooked for the appropriate time and has reached the desired consistency, you can add a tablespoon or two (about 15 to 30 grams) of unsalted butter (if using) and a teaspoon or two (about 5 to 10 milliliters) of vanilla extract. Stir them in until they’re completely incorporated. The butter will give the pudding a smooth and glossy finish and add an extra layer of richness, while the vanilla extract enhances the flavor.
Straining (Optional): If you want an extra smooth pudding, pour the cooked pudding through a fine-mesh strainer into a large mixing bowl or directly into the serving dishes. Use a spatula to help push the pudding through the strainer, leaving behind any small lumps or bits of cooked egg (if using). This step is not necessary but can result in a more refined texture.
Step 6: Pouring and Cooling the Pudding
Pouring into Serving Dishes: Using the spatula, carefully spoon or pour the pudding into the individual serving dishes or the large serving bowl. Divide it evenly if using multiple dishes. Make sure to fill them to the desired level, leaving a bit of room at the top if you plan to add toppings later.
Preventing a Skin from Forming: Once the pudding is in the dishes, immediately cover it with plastic wrap. Press the plastic wrap gently so that it touches the surface of the pudding all over. This helps prevent a skin from forming on top as the pudding cools. If you don’t like the idea of the plastic wrap touching the pudding, you can also create a makeshift lid by placing a piece of parchment paper or wax paper on top of the pudding and then covering it loosely with plastic wrap.
Cooling: Let the pudding cool at room temperature for a short while, about 10 to 15 minutes. Then, transfer it to the refrigerator to chill completely. It will take about 1 to 2 hours for the pudding to set firmly, depending on the size of the servings and the temperature of your refrigerator.
Step 7: Serving and Garnishing the Pudding
Serving: Once the pudding is chilled and set, it’s ready to be served. You can serve it directly from the individual dishes or transfer it to plates if you prefer. Chocolate pudding can be enjoyed on its own, but there are many ways to make it even more indulgent.
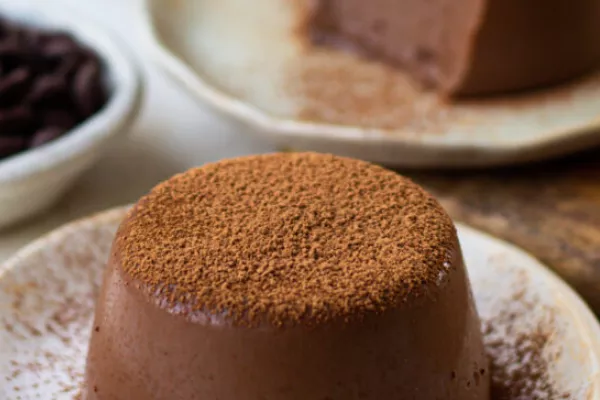
Garnishing: For an extra touch of decadence, consider adding some garnishes. A dollop of whipped cream on top is a classic choice. You can make your own whipped cream by whipping heavy cream with a bit of sugar and vanilla extract until soft peaks form. Chocolate shavings or curls, made by running a vegetable peeler along the edge of a chocolate bar, add a beautiful and delicious touch. A drizzle of caramel sauce, a sprinkle of chopped nuts, or a dusting of cocoa powder can also enhance the presentation and flavor of the pudding.
Conclusion
In conclusion, preparing pumpkin for pie is a straightforward and rewarding culinary task that results in a delicious and festive dessert that’s perfect for the holidays. By following a simple recipe and paying attention to detail, you can create a pumpkin pie filling that’s smooth, creamy, and bursting with flavor.
The key to successful pumpkin pie filling is to start with high-quality pumpkin puree, whether homemade or store-bought. Be sure to cook the pumpkin puree with the other ingredients, such as sugar, spices, and evaporated milk, over low heat and stir constantly to prevent scorching and ensure a smooth texture. Also, it’s important to let the filling cool completely before pouring it into the pie crust to ensure that it sets properly.
Once your pumpkin pie filling is ready, you can use it to create a classic pumpkin pie or get creative and add your own unique twists and flavors. You can add a splash of bourbon or rum, a pinch of nutmeg or allspice, or a handful of chopped nuts or dried fruit to the filling for an extra layer of flavor complexity.
In addition to its delicious flavor, pumpkin pie is also a versatile dessert that can be enjoyed in a variety of ways. You can serve it warm or chilled, with whipped cream or a scoop of vanilla ice cream, or with a drizzle of caramel or chocolate sauce. You can also use the filling as a topping for yogurt, oatmeal, or pancakes, or as a dipping sauce for cookies or fruit.
So, if you’re looking for a delicious and festive dessert that’s sure to become a holiday tradition, give pumpkin pie a try. With its creamy texture and rich, spiced flavor, it’s a treat that’s sure to delight your taste buds and warm your heart. Happy baking!
Related Topics:


