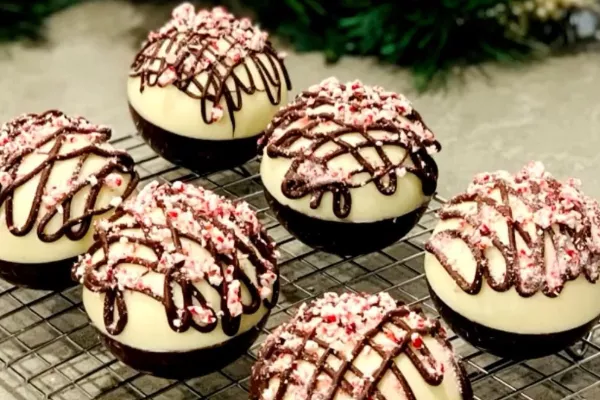
Peppermint cocoa bombs are a fun and festive treat that will warm your heart and fill your cup with delicious chocolatey goodness. These delightful treats are perfect for the holiday season or any time you want to enjoy a cozy hot chocolate experience. In this guide, I will show you how to make peppermint cocoa bombs, from start to finish, with easy-to-follow instructions. Let’s dive in!
What Are Peppermint Cocoa Bombs?
Peppermint cocoa bombs are spheres made of chocolate that contain hot cocoa mix and mini marshmallows, along with a surprise burst of peppermint flavor. When hot milk or water is poured over the cocoa bomb, it melts, releasing the cocoa mix and marshmallows, creating a delicious cup of hot cocoa. The peppermint flavor adds a refreshing twist to the traditional hot chocolate, making it even more special.
Ingredients You Will Need
Before you begin, gather all of the ingredients and supplies you will need to make your peppermint cocoa bombs. Here’s what you’ll need:
For the Chocolate Shells:
- 2 cups of high-quality chocolate chips (dark, milk, or white chocolate)
- 1 tablespoon of coconut oil (optional, for smoothness)
For the Filling:
- 1/2 cup of hot cocoa mix (you can use store-bought or homemade)
- 1/4 cup of crushed peppermint candies (or peppermint extract, if preferred)
- 1/4 cup of mini marshmallows
- 1 tablespoon of crushed peppermint bark (optional, for extra flavor)
Tools:
- Silicone sphere mold (or any other mold you prefer)
- Heatproof bowl
- Spoon or spatula
- Small bag or piping bag (for filling)
- Microwave or double boiler
- Refrigerator (optional, for setting the chocolate)
Step-by-Step Instructions
Now that you have everything you need, it’s time to start making your peppermint cocoa bombs. Follow these steps carefully to ensure the perfect result.
Step 1: Melt the Chocolate
Start by melting the chocolate. You can use either a microwave or a double boiler for this step.
Microwave Method:
- Place the chocolate chips into a microwave-safe bowl.
- Microwave the chocolate in 30-second intervals, stirring after each interval. Continue until the chocolate is fully melted and smooth.
- Add coconut oil if you want a smoother finish. Stir it in until well combined.
Double Boiler Method:
- Fill the bottom pot of a double boiler with water, making sure the water doesn’t touch the top pot.
- Place the chocolate chips into the top pot and stir occasionally as the chocolate melts.
Both methods work great, so feel free to choose the one you’re most comfortable with.
Step 2: Coat the Silicone Mold
Once your chocolate is melted, it’s time to coat the silicone mold.
- Using a spoon or a small brush, carefully coat the inside of each cavity of the silicone mold with melted chocolate. Be generous with the coating, but make sure it’s not too thick. Aim for a smooth, even layer.
- Once the first layer is done, place the mold in the refrigerator or freezer for 5–10 minutes to set the chocolate.
- After the first layer sets, apply a second layer of chocolate to each mold cavity. This will make the cocoa bombs sturdy and durable.
- Place the mold back in the fridge or freezer for another 5–10 minutes to set completely.
Step 3: Remove the Chocolate Shells from the Mold
Once the chocolate is fully set, gently remove the shells from the silicone mold. Carefully pop each chocolate sphere out, taking care not to break them. If any cracks occur, don’t worry—these can be patched later.
Step 4: Prepare the Cocoa Bomb Filling
While the chocolate is setting, you can prepare the filling. Here’s how:
- Mix the hot cocoa powder with the crushed peppermint candies. If you’re using peppermint extract instead, add just a few drops to the cocoa mix for a flavorful kick.
- Add the mini marshmallows and crushed peppermint bark, if using. Mix everything together well.
This will be the cozy filling inside your peppermint cocoa bombs!
Step 5: Assemble the Cocoa Bombs
Now that the chocolate shells are ready and the filling is prepared, it’s time to assemble your peppermint cocoa bombs.
- Take one chocolate shell and place it flat on a heatproof surface.
- Spoon about 2 tablespoons of the cocoa mix into the shell. Add a few mini marshmallows and a sprinkle of crushed peppermint if desired.
- Take a second chocolate shell and gently press it over the filled shell, sealing the edges together. If the edges don’t stick, you can melt a small amount of chocolate and use it as “glue” to help seal the two halves.
Step 6: Seal and Decorate
To make sure your cocoa bombs stay sealed, you can use a few different methods.
- Melt and Seal: Heat a plate or frying pan over low heat. Place the open side of the filled chocolate sphere briefly on the pan, allowing the edge to melt slightly. Then, place the second half of the sphere on top and gently press it to seal.
- Decorating the Cocoa Bombs: Once the bombs are sealed, you can decorate the outside with more melted chocolate. Drizzle some chocolate over the top and sprinkle extra crushed peppermint or mini marshmallows for a festive touch.
Step 7: Store the Peppermint Cocoa Bombs
Once you’ve decorated your peppermint cocoa bombs, allow them to cool completely before storing them. Place them in an airtight container and store them in a cool, dry place. They will stay fresh for up to two weeks.
How to Use Peppermint Cocoa Bombs
The fun doesn’t stop after making these delicious treats. To use your peppermint cocoa bombs, follow these simple steps:
- Boil about 8 ounces of milk (or hot water, if preferred).
- Place your peppermint cocoa bomb in a mug.
- Pour the hot milk over the cocoa bomb. Watch as the bomb melts and releases the cocoa mix, marshmallows, and peppermint flavor into the milk.
- Stir the cocoa to fully dissolve the chocolate and enjoy your cozy cup of peppermint hot cocoa!
Tips for Making Perfect Peppermint Cocoa Bombs
Use Quality Chocolate: The better the chocolate, the better the cocoa bomb. Look for high-quality chocolate chips or chocolate bars for the best results.
Customize the Flavor: You can adjust the amount of peppermint depending on how strong you want the flavor. More crushed peppermint candies will make the flavor more intense, while a few drops of peppermint extract will give a subtler taste.
Use a Warm Plate for Sealing: If the chocolate shells don’t seal properly, using a warm plate or pan will help melt the edges and make them stick.
Get Creative with Decorations: You can decorate your cocoa bombs with a variety of toppings like sprinkles, colored sugar, or even a drizzle of white chocolate.
Why You’ll Love Peppermint Cocoa Bombs
Peppermint cocoa bombs are more than just a fun treat; they also provide a deliciously comforting experience. The rich chocolate combined with the refreshing peppermint creates a perfect winter drink. Whether you make them for yourself or gift them to friends and family, these cocoa bombs are sure to bring a smile to everyone’s face.
Conclusion
Making peppermint cocoa bombs is a simple and enjoyable process. With just a few ingredients and some patience, you can create beautiful, delicious cocoa bombs that are perfect for sipping on a cold day or gifting to loved ones. By following this guide, you’ll be able to make your own peppermint cocoa bombs at home and enjoy a cozy, flavorful drink anytime you want.
If you’re looking for a fun holiday project or a treat to warm your heart, peppermint cocoa bombs are the perfect choice. Give them a try, and you’ll see how easy and enjoyable making these festive delights can be. Happy cocoa bomb making!
Related topics