Doll cakes are a fun, creative, and eye-catching way to celebrate any special occasion, especially birthdays. They are often the centerpiece of a party, delighting children and adults alike with their whimsical and colorful design. If you’ve ever wondered how to make a doll cake, you’re in the right place! This guide will walk you through every step, from baking to decorating. With simple instructions and tips, you’ll be able to create a stunning doll cake that will wow your guests.
What is a Doll Cake?
A doll cake is a cake that has a doll embedded in the center. The doll serves as the figurine on top of the cake, often representing a princess, ballerina, or other imaginative character. The cake is shaped like a skirt, with the doll acting as the torso. It’s a cake that’s both a treat and a showpiece.
Tools and Ingredients Needed
Before starting, it’s important to gather all the necessary tools and ingredients. Here’s what you’ll need:
Tools
- Mixing bowls
- Electric mixer or whisk
- Measuring cups and spoons
- Cake pans (one larger and one smaller)
- Spatula
- Knife for trimming
- Piping bags and tips
- Cake board or plate for displaying the cake
- Doll (choose one with a removable skirt or dress)
- Plastic wrap
- Toothpicks (for securing the doll)
Ingredients for the Cake
- 2 boxes of cake mix (or homemade cake recipe)
- 1 cup of butter
- 4 large eggs
- 1 cup of milk
- 2 teaspoons of vanilla extract
- Buttercream frosting (or your choice of frosting)
- Food coloring (for the skirt)
Ingredients for the Buttercream Frosting
- 1 cup of unsalted butter, softened
- 4 cups of powdered sugar
- 2 teaspoons of vanilla extract
- 2-3 tablespoons of milk or heavy cream
- A pinch of salt
Step 1: Bake the Cake
Start by preparing your cake batter. If you’re using store-bought cake mix, follow the instructions on the box. For a homemade cake, you can mix flour, sugar, eggs, butter, and vanilla extract.
Preparing the Pans
You will need two cake pans. One should be a larger pan (typically 8 or 9 inches) for the skirt and a smaller pan (around 4-5 inches) for the doll’s torso.
- Preheat your oven to the temperature recommended on the cake mix box or your recipe.
- Grease and flour both cake pans. This will make it easier to remove the cakes once they’re baked.
Baking the Cake
Pour the batter into both pans. Bake the larger cake for about 30-35 minutes and the smaller one for 15-20 minutes. Always check the cakes with a toothpick to ensure they are fully baked—if it comes out clean, the cakes are ready.
Once baked, let the cakes cool in the pans for about 10 minutes, then remove them from the pans and let them cool completely on a wire rack.
Step 2: Prepare the Doll
While the cake is cooling, prepare your doll. Choose a doll that has a removable skirt. The doll should be sturdy enough to be inserted into the cake without breaking.
- Remove the doll’s clothes and accessories.
- If the doll has a hard plastic bottom, trim it down so that it will sit neatly inside the cake.
- Wrap the doll’s legs in plastic wrap to keep the cake safe and sanitary. You can also wrap it with aluminum foil for extra protection.
Make sure that the doll will fit inside the center of your cake. You can adjust the height by cutting the bottom of the doll if necessary.
Step 3: Shape the Cake
Once the cakes have cooled, it’s time to shape them to create the skirt.
Trim the Larger Cake: Start by trimming the larger cake so that it is level and smooth. This will help when stacking the cakes.
Shape the Smaller Cake: Trim the smaller cake to make it fit inside the larger cake. This is where the doll will sit, so be careful not to make the hole too big or too small.
Stack the Cakes: Place the larger cake on your cake board or a large serving plate. Then, cut a small hole in the center of the cake (this is where the doll’s waist will fit). Gently place the smaller cake on top, aligning it with the larger one. You may need to carve the sides of the smaller cake to ensure that the doll will sit properly.
Step 4: Frosting the Cake
Now it’s time to frost the cake. The frosting will serve two purposes: covering the cake and creating the beautiful skirt for the doll.
Buttercream Frosting: Start by preparing the buttercream frosting. In a large bowl, mix the softened butter and powdered sugar together using an electric mixer. Add the vanilla extract and a pinch of salt. Gradually add milk or heavy cream to achieve a smooth, spreadable consistency.
Frost the Skirt: Use your frosting to cover the entire outer surface of the large cake (the skirt). This is where you can get creative and color the frosting. Use food coloring to make the skirt the color of your choice. You can even make different shades or add sprinkles for a fun touch.
Frost the Bodice: Once the skirt is done, frost the smaller cake as well, ensuring it looks like the bodice of the doll’s dress. This part can also be decorated with fondant or frosting in different designs like flowers or lace.
Smooth the Frosting: Use a spatula to smooth out the frosting. For a polished look, you can use a cake smoother or even a bench scraper.
Step 5: Insert the Doll
Once the cake is frosted, it’s time to insert the doll.
Create a Hole: Take the plastic-wrapped doll and gently create a hole in the center of the cake where you want the doll to sit. It should go deep enough for the doll to fit securely.
Place the Doll in the Cake: Insert the doll into the hole, pushing it down until it sits firmly. The skirt of the cake should cover the bottom of the doll’s legs, creating the illusion of a flowing gown.
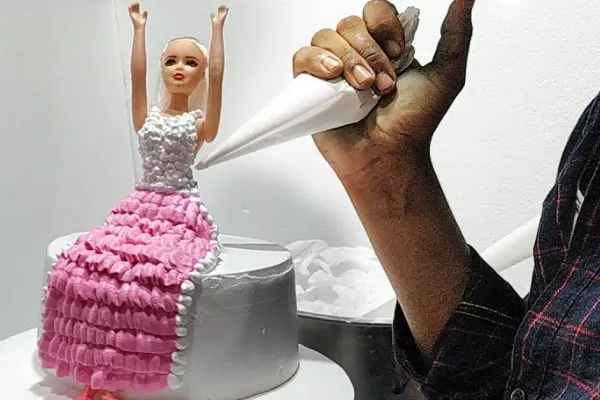
Step 6: Decorate the Cake
Now that the basic structure is in place, it’s time to add the final touches.
Add Details: You can use frosting to add details like flowers, ruffles, or ribbons around the skirt. If you want a more intricate design, use fondant for more detailed decorations.
Edible Decorations: Consider adding edible glitter or small sugar flowers for extra sparkle. You can also place edible pearls or rhinestones on the bodice of the doll to make it look more elegant.
Final Touches on the Skirt: Use piping bags with different tips to add texture or borders around the skirt. You can create a lace-like effect or add a wavy design to make it look like a real gown.
Step 7: Serve the Cake
Once you’re happy with the decoration, your doll cake is ready to be served. Be sure to cut around the doll carefully to keep the cake intact. Once the cake is served, you can either save the doll for later use or let the kids play with it after the cake is cut!
Tips for a Perfect Doll Cake
Sturdy Cakes: Make sure the cakes are firm enough to support the weight of the doll. If needed, you can freeze the cakes before assembling the doll cake.
Smooth Layers: Take your time when frosting to make sure the layers are smooth and even.
Doll Size: Make sure the doll fits well inside the cake. If the doll is too tall, you might have to adjust the size of the cakes.
Flavor Variations: Feel free to mix and match cake flavors. A chocolate cake base with vanilla frosting can create a beautiful contrast.
Conclusion
Making a doll cake is a fun and creative way to impress your friends and family at any celebration. By following these simple steps, you’ll be able to create a stunning cake that not only tastes great but also looks fantastic. Whether you’re making it for a birthday party or a special occasion, your doll cake will surely be a showstopper. Enjoy the process, and most importantly, enjoy the smiles it brings to everyone!
Related topics