Making a mermaid cake can be a fun and creative project. Whether you’re celebrating a birthday, hosting a themed party, or just want to try something new, this cake is sure to impress. This guide will walk you through everything you need to know, from choosing the right cake flavor to decorating your mermaid masterpiece. Let’s dive in!
Ingredients You Will Need
To make a mermaid cake, you’ll need a few key ingredients. These will include cake mix, frosting, and decorations. You can either use store-bought products or make everything from scratch, depending on your preference.
For the cake:
- 2 cups all-purpose flour
- 2 cups granulated sugar
- 1 tablespoon baking powder
- 1/2 teaspoon baking soda
- 1/2 teaspoon salt
- 1 cup unsalted butter (room temperature)
- 4 large eggs
- 1 teaspoon vanilla extract
- 1 cup whole milk
- Food coloring (blue, purple, green, and aqua)
For the frosting:
- 2 cups unsalted butter (room temperature)
- 4 cups powdered sugar
- 2 teaspoons vanilla extract
- 2-4 tablespoons heavy cream or milk
- Food coloring (blue, purple, green, and aqua)
-
A pinch of salt
For the decorations:
- Mermaid tail cake topper (or mold)
- Edible glitter or pearl dust (optional)
- Sugar pearls or sprinkles
- Sea shells (made of candy or edible fondant)
- Royal icing for detailing (optional)
Step 1: Bake the Cake
Start by preheating your oven to 350°F (175°C). Grease and flour two 8-inch round cake pans to prepare them for the batter.
Make the cake batter:
- In a large bowl, combine the flour, sugar, baking powder, baking soda, and salt. Stir the dry ingredients together until well mixed.
- Add the butter, eggs, vanilla extract, and milk to the bowl. Mix everything together using a hand mixer or stand mixer on medium speed until smooth and fully combined.
- Divide the batter into separate bowls, depending on how many colors you want for your mermaid theme. Typically, you’ll use blue, purple, green, and aqua. Add a few drops of food coloring to each bowl until you achieve the desired shades.
- Pour each colored batter into the prepared cake pans. Use a spoon or spatula to swirl the colors together lightly, creating a marble effect. This will give your cake a beautiful, ocean-inspired appearance.
- Bake the cakes for 25-30 minutes, or until a toothpick inserted into the center comes out clean. Once baked, remove the cakes from the oven and allow them to cool completely on a wire rack.
Step 2: Prepare the Frosting
While the cakes are cooling, prepare the frosting. This will be a smooth, creamy frosting that holds the cake layers together and is perfect for decorating.
Make the frosting:
- In a large mixing bowl, beat the butter with a hand mixer or stand mixer until it’s soft and fluffy (about 3-5 minutes).
- Gradually add the powdered sugar, one cup at a time, and continue to beat on low speed until smooth.
- Add the vanilla extract and a pinch of salt. Continue to beat until combined.
- Slowly add heavy cream or milk to reach the desired consistency. The frosting should be smooth and spreadable, but not too runny.
- Divide the frosting into bowls for coloring. Again, you’ll want to use the same colors as your cake batter—blue, purple, green, and aqua. Mix until the frosting is well-colored.
Step 3: Assemble the Cake
Now that the cake layers and frosting are ready, it’s time to assemble the mermaid cake.
- Place one cake layer on a cake board or serving plate. This will be the base layer.
- Spread a thin layer of frosting over the first cake layer. Don’t worry about making it perfect—this layer is just to help the second layer stick.
- Place the second cake layer on top, aligning it carefully with the bottom layer.
- Apply a crumb coat of frosting all over the cake. This is a thin layer that will lock in any crumbs and create a smooth surface for the final decoration. Refrigerate the cake for 20-30 minutes to allow the crumb coat to set.
Step 4: Decorate the Cake
Now the fun part begins! Decorating the cake is where you can get really creative. The mermaid theme opens up many possibilities for beautiful designs.
Apply the final coat of frosting:
- Begin by frosting the entire cake with one color. Start at the top and work your way down the sides. You can use a spatula or a piping bag to apply the frosting.
- Once the cake is covered with one color, switch to another color and continue frosting, blending the colors together to create a smooth transition.
- You can make the frosting appear more textured, resembling ocean waves or mermaid scales. To do this, use a small offset spatula or a butter knife to create a wavy, scaled texture.
Add decorations:
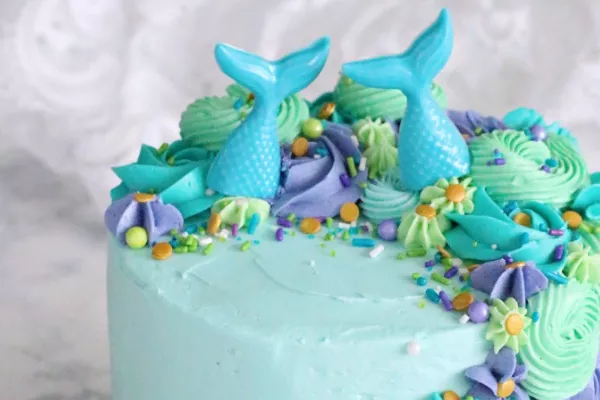
Mermaid tail: A great way to add a unique touch is to place a mermaid tail topper on the cake. You can find edible mermaid tails or make your own using fondant. Place the tail in the center or slightly off-center on top of the cake.
Sea shells and pearls: Add some sugar pearls, edible glitter, or candy sea shells around the base and top of the cake to enhance the mermaid theme. You can also use royal icing to pipe small seashells or coral-like designs onto the cake.
Glitter and shimmer: If you want to give your cake a magical, underwater sparkle, dust it with edible glitter or pearl dust. This will make the cake shimmer in the light, mimicking the ocean’s sparkle.
Step 5: Final Touches
Once your mermaid cake is decorated, step back and assess your creation. You can add any extra details like piped frosting waves, a seaweed design, or even small fondant fish. The possibilities are endless, so don’t be afraid to get creative!
Step 6: Serve the Cake
When the cake is complete, it’s time to serve. Slice into the cake and reveal the beautiful layers inside. The colors and textures of the cake should resemble the ocean, making each slice look just as magical as the outside.
Tips for Making Your Mermaid Cake Even More Stunning
Use fondant accents: If you want to add more intricate details, such as mermaid scales or shells, consider using fondant. You can mold fondant into shapes like sea creatures, shells, or mermaid fins and then place them on the cake.
Add a water effect: For an extra special touch, you could use a blue gelatin glaze to create a water-like effect over the top of the cake.
Personalize it: If the cake is for a specific person, consider adding their name or a special message on top of the cake in frosting or edible letters.
Conclusion
Making a mermaid cake is a creative and enjoyable way to celebrate any ocean-themed occasion. By following the steps outlined in this guide, you can create a cake that not only looks beautiful but also tastes delicious. Whether you’re a beginner or an experienced baker, this project is a great way to practice your cake-decorating skills. So, gather your ingredients, get creative, and have fun creating your own mermaid masterpiece!
Related topics