Making a geode cake is a fun and creative way to decorate your cake. The beautiful, crystalline look of a geode is an impressive and elegant touch for any occasion. Whether you’re preparing for a birthday, wedding, or just want to wow your guests, a geode cake is sure to stand out. This step-by-step guide will walk you through the process, from baking the cake to adding the finishing touches.
What is a Geode Cake?
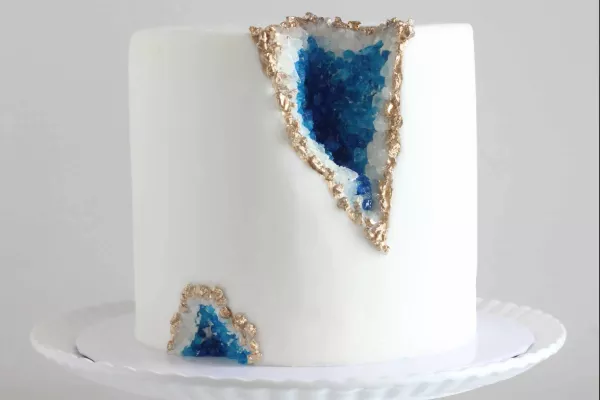
A geode cake is a cake decorated to resemble the inside of a geode. Geodes are rock formations that contain mineral crystals, and a geode cake mimics this effect using colorful, edible crystals made from candy and sugar. The geode effect on the cake looks like sparkling crystals embedded in the cake, and it creates a stunning visual that looks almost too beautiful to eat.
Ingredients Needed
Before you start making your geode cake, gather all the necessary ingredients. Here’s a list of what you will need:
For the Cake:
- 2 to 3 layers of your favorite cake (chocolate, vanilla, or any flavor you like)
- Butter or oil for greasing the pans
- Flour for dusting the pans
- 1 ½ cups all-purpose flour
- 1 ½ cups granulated sugar
- ½ cup unsalted butter (room temperature)
- 3 large eggs
- 1 cup whole milk
- 1 teaspoon vanilla extract
- 1 ½ teaspoons baking powder
- ½ teaspoon salt
For the Frosting:
- 1 ½ cups unsalted butter (room temperature)
- 4 cups powdered sugar
- 2 teaspoons vanilla extract
- 2 tablespoons heavy cream
- Food coloring (optional)
For the Geode Crystals:
- Rock candy (variety of colors)
- Isomalt (a sugar substitute that creates clear, glass-like crystals)
- Luster dust or edible glitter (optional for extra sparkle)
- Corn syrup (for sticking the crystals in place)
- Gel food coloring (for coloring the rock candy)
Tools Needed
- Round cake pans (3-inch or 6-inch)
- Piping bags and tips
- Offset spatula
- Stand mixer or hand mixer
- Toothpicks or skewers
- Double boiler or microwave-safe bowl
- Cake board or platter
- Sharp knife for cutting the cake layers
- Large mixing bowls
- Candy thermometer (for melting isomalt)
Step 1: Bake the Cake
The first step in making a geode cake is baking your cake layers. You can use any flavor of cake you prefer. Here’s a simple method for a basic vanilla cake.
- Preheat your oven to 350°F (175°C).
- Grease your cake pans with butter and dust them with flour to prevent sticking. You can also line the pans with parchment paper.
- In a mixing bowl, combine the flour, sugar, baking powder, and salt. Stir to mix.
- Add the butter and eggs to the dry ingredients and mix until smooth.
- Gradually add the milk and vanilla extract, continuing to mix until the batter is smooth and well-combined.
- Divide the batter evenly between the prepared cake pans.
- Bake in the oven for 25 to 30 minutes or until a toothpick inserted into the center of the cake comes out clean.
- Once the cakes are done, allow them to cool in the pans for about 10 minutes before transferring them to a wire rack to cool completely.
Step 2: Prepare the Frosting
While your cake is cooling, you can prepare the frosting. A simple buttercream frosting is ideal for geode cakes as it holds the shape well and complements the cake’s flavors.
- In a stand mixer, beat the butter on medium speed until light and fluffy.
- Gradually add the powdered sugar, one cup at a time, continuing to mix until fully combined.
- Add the vanilla extract and heavy cream and beat on high speed for about 3-4 minutes until the frosting is smooth and fluffy.
- If you plan to color your frosting, divide the frosting into smaller bowls and add a few drops of food coloring to each. For a geode effect, use jewel tones like purple, teal, or blue.
Step 3: Level and Stack the Cake Layers
Once your cakes are cool, it’s time to level and stack them. This step ensures that your geode cake will have an even and stable base.
- Use a sharp knife or cake leveler to trim the tops of your cake layers, making them flat and even.
- Place the first layer of cake on your cake board or platter. Use a spatula to spread a thin layer of frosting on top of the cake layer.
- Add the second layer of cake and repeat the process. Continue stacking the layers of cake, spreading frosting in between.
- Once all the layers are stacked, apply a thin crumb coat (a light layer of frosting) over the entire cake. This helps seal in the crumbs and gives you a smooth surface for the final layer of frosting.
- Chill the cake in the refrigerator for about 30 minutes to allow the crumb coat to set.
Step 4: Frost the Cake
After the crumb coat has set, you can apply the final layer of frosting to the cake.
- Using your offset spatula, apply a thick layer of frosting all over the cake. Try to make the frosting as smooth as possible.
- If you want a textured look, you can use a bench scraper or the back of a spoon to add texture to the sides of the cake.
Step 5: Create the Geode Effect
Now comes the fun part—creating the geode effect with edible crystals. There are two main ways to make these crystals: using rock candy or isomalt. We’ll cover both methods here.
Method 1: Using Rock Candy
- To color your rock candy, break it into smaller pieces. You can do this by placing it in a plastic bag and using a hammer to break it.
- Add a few drops of gel food coloring to each piece of candy and stir until the candy is evenly coated.
- Carefully place the colored rock candy pieces on the cake, arranging them in a geode-like shape. You can create an opening in the center where the crystals will be clustered, mimicking the inside of a real geode.
- Arrange the candy so that it gradually gets smaller as you move outward from the center.
- If needed, use a small amount of corn syrup to help the crystals stick in place.
Method 2: Using Isomalt
- Melt the isomalt in a double boiler or microwave, following the package instructions. Use a candy thermometer to make sure the temperature reaches around 320°F (160°C).
- Once melted, pour the isomalt into a silicone mold or on a parchment-lined baking sheet to harden. You can break the hardened isomalt into crystal-like shards after it cools.
- Once you have your isomalt crystals, use a little corn syrup to attach them to the cake, just like with the rock candy.
Step 6: Final Touches
- Once you’ve arranged the crystals in a geode shape, you can add some extra sparkle. Use edible glitter or luster dust to brush over the crystals for a shimmering effect.
- If you want, you can also add some sugar flowers or edible gold leaf to enhance the look of your cake.
Step 7: Serve and Enjoy
Your geode cake is now ready to be served! Slice it up and enjoy the stunning beauty of the edible crystals inside. Your guests will be amazed at how realistic the geode effect looks.
Tips for Making the Perfect Geode Cake
- Make sure your cake layers are completely cooled before frosting them. This will prevent the frosting from melting or sliding off the cake.
- When using rock candy, be careful not to break it into too many tiny pieces. Larger chunks will give a more realistic geode appearance.
- If you’re using isomalt, be cautious when handling it, as it can become very hot. Always use oven mitts and be mindful of the temperature.
- Use colors that complement each other. Jewel tones like purple, teal, and gold look great for a geode cake.
Conclusion
Making a geode cake is a creative and rewarding process. With a little patience and the right materials, you can create a cake that not only tastes delicious but also looks stunning. Whether you’re a seasoned baker or a beginner, the steps outlined here will help you craft a beautiful geode cake that will wow your friends and family. Happy baking!
Related topics