Icebox cake is a classic dessert that is easy to prepare and requires minimal ingredients. This dessert is known for its creamy, rich texture and the perfect balance of sweetness. Whether you’re a beginner baker or someone who enjoys making simple treats, this no-bake dessert is ideal. Let’s dive into the step-by-step process of how to make icebox cake, the history behind it, and tips for creating the perfect icebox cake.
What is an Icebox Cake?
An icebox cake is a no-bake dessert made by layering cookies and whipped cream or pudding. The name “icebox” comes from the fact that the dessert needs to be chilled in the refrigerator (or icebox) to allow the layers to meld together and form a creamy texture. The cookies absorb the moisture from the cream, softening and creating a cake-like consistency.
The most common cookies used are graham crackers, chocolate wafer cookies, or even vanilla wafers. Icebox cakes are a versatile dessert because they can be customized with different flavors, toppings, and fillings.
Ingredients for Icebox Cake
To make a traditional icebox cake, you will need a few basic ingredients. Here’s a simple list of what you’ll need:
Whipping cream: Heavy cream works best, as it whips up well and gives the cake a light, airy texture.
Sugar: You’ll need some sugar to sweeten the whipped cream.
Vanilla extract: For added flavor.
Cookies: Graham crackers or chocolate wafers are the most common, but you can get creative with your choice of cookies.
Optional: You can add chocolate chips, fruit, or nuts to add texture and flavor to your cake.
Tools You’ll Need
Before we get started, make sure you have the following tools ready:
Mixing bowl: To whip the cream and mix other ingredients.
Electric mixer or whisk: An electric mixer makes the whipping process easier, but you can also use a hand whisk.
Spatula: For spreading the whipped cream between layers.
Baking dish or loaf pan: To layer the cake and let it set.
Plastic wrap: To cover and chill the cake in the refrigerator.
Step-by-Step Guide to Making Icebox Cake
Here’s how to make a classic icebox cake from start to finish:
Step 1: Whip the Cream
Start by preparing your whipped cream. Pour the heavy cream into a mixing bowl. Add sugar and a splash of vanilla extract to enhance the flavor. Using an electric mixer or a hand whisk, beat the cream on medium speed until soft peaks form. This should take about 2 to 3 minutes. Be careful not to overwhip, or the cream may turn into butter.
Step 2: Layer the Cookies
Next, it’s time to create the layers. Choose a baking dish or a loaf pan. The size of the dish will depend on how much cake you want to make. A 9×13-inch dish works perfectly for most recipes. Lay your cookies in a single layer at the bottom of the dish. If you are using graham crackers, break them to fit the shape of the dish.
Step 3: Spread the Whipped Cream
Once the cookies are in place, spread a generous layer of the whipped cream over the cookies. Use a spatula to spread it evenly. Make sure each cookie is covered with a good amount of cream. The cream will soften the cookies as the cake chills.
Step 4: Repeat the Layers
Repeat the process of layering cookies and whipped cream until you’ve filled the dish. Aim for about 3 to 4 layers, but you can add more depending on the size of your dish. Make sure the final layer is whipped cream to create a smooth, creamy topping.
Step 5: Chill the Cake
Once the layers are complete, cover the dish with plastic wrap. Place it in the refrigerator and allow it to chill for at least 4 to 6 hours, or overnight for the best results. The longer the cake sits, the better the flavors meld together. The cookies will soften, and the cream will thicken into a rich, mousse-like texture.
Step 6: Serve and Enjoy
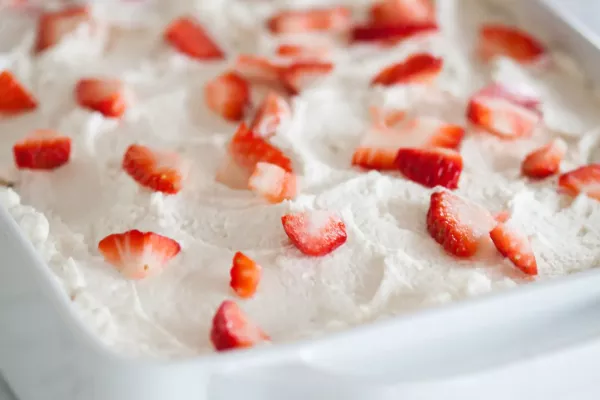
When you’re ready to serve, remove the icebox cake from the refrigerator. You can cut it into slices or scoop it out into bowls. Top it with chocolate shavings, berries, or a drizzle of caramel sauce for added flavor and decoration.
Enjoy the creamy, delicious layers of your homemade icebox cake!
Tips for the Best Icebox Cake
Making an icebox cake is simple, but there are a few tips to ensure that it turns out perfectly every time:
1. Use Cold Ingredients
Cold cream whips better, so make sure your heavy cream is chilled before whipping. If possible, chill your mixing bowl and beaters in the fridge for a few minutes before starting. This helps the cream whip faster and gives it a better texture.
2. Customize with Add-ins
Feel free to get creative with your icebox cake by adding extras like chocolate chips, crushed candy bars, or fresh berries between the layers. This will give your cake a unique twist and make it even more delicious.
3. Choose the Right Cookies
Graham crackers are the classic choice, but you can use chocolate wafers or vanilla wafers for a different flavor. The cookies need to be sturdy enough to hold up during the chilling process, so avoid using overly soft cookies.
4. Let it Chill Long Enough
Patience is key when making an icebox cake. Be sure to let the cake chill for several hours or overnight. This will allow the layers to set and create that signature soft cake-like texture.
5. Top with Extra Toppings
For extra flavor, top your icebox cake with whipped cream, chocolate ganache, or fruit. You can also add a sprinkle of cocoa powder or powdered sugar for decoration.
6. Use a Loaf Pan for Easy Slicing
A loaf pan is a great choice if you want individual slices of icebox cake. It allows for easy slicing and makes the cake look more like a traditional dessert.
Variations of Icebox Cake
While the classic version of icebox cake is always a hit, you can try different flavor variations to suit your taste. Here are some ideas:
Chocolate Icebox Cake
For a chocolate twist, use chocolate wafer cookies instead of graham crackers. You can also add chocolate pudding in between the layers or drizzle some melted chocolate on top for added richness.
Fruit Icebox Cake
Add fresh fruit like berries or sliced bananas between the layers of cream. You can even mix the fruit into the whipped cream to create a fruity filling.
Coffee Icebox Cake
For a coffee-flavored icebox cake, add instant coffee or espresso powder to the whipped cream. This creates a delightful coffee flavor that pairs well with chocolate cookies.
Nutty Icebox Cake
For a crunchy texture, add chopped nuts, like walnuts or almonds, between the layers. This adds a delicious contrast to the smooth, creamy filling.
Mint Chocolate Icebox Cake
Mix a few drops of mint extract into the whipped cream and use chocolate cookies for a refreshing mint-chocolate flavor combination. You can also add chocolate shavings or crushed candy canes for an extra crunch.
How to Store Icebox Cake
Once you’ve made your icebox cake, it can be stored in the refrigerator for up to 3 days. Keep it covered with plastic wrap or aluminum foil to ensure it stays fresh. The longer it sits, the more the flavors develop, but it’s best to eat it within a few days for optimal freshness.
Conclusion
Making an icebox cake is a fun, easy way to create a delicious dessert without turning on the oven. With just a few simple ingredients and some patience, you can prepare a dessert that is creamy, sweet, and perfect for any occasion. Whether you choose the classic version or customize it with your favorite flavors, icebox cake is sure to be a crowd-pleaser. Happy baking!
Related topics