Cakes have always been a centerpiece of celebrations, and their appearance is just as important as their taste. Over the years, cake decorating has evolved, with edible images being one of the most popular trends. Edible pictures allow cake decorators to add vibrant designs, photos, and detailed images to cakes, making them perfect for special occasions like birthdays, weddings, and anniversaries.
Making edible pictures for cakes may sound complicated, but with the right tools and knowledge, you can create beautiful, edible works of art with ease. This article will walk you through the process of making edible pictures on cakes, step by step. Whether you’re a professional baker or someone who enjoys baking at home, this guide will help you understand the process, from choosing the right materials to applying the edible images on cakes.
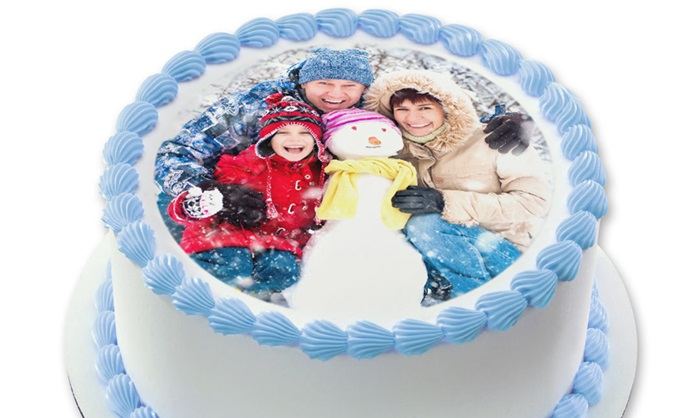
What Are Edible Pictures?
Edible pictures are images that are printed onto edible paper using edible ink. These images can be anything from photographs to designs, logos, or characters, and they can be placed directly onto cakes, cupcakes, cookies, and other baked goods. The most common types of edible papers used are wafer paper and fondant, and the edible ink is typically made from food-grade ingredients like water, food coloring, and sugar.
When applied correctly, edible images can add a personalized touch to your cakes. They are a fantastic way to create intricate designs that would be time-consuming to pipe by hand, and they offer a professional look that can elevate any cake.
Materials Needed for Edible Pictures on Cakes
Before you can make edible pictures for your cakes, you’ll need a few key materials. Here’s a list of what you’ll need:
1. Edible Ink Printer
An edible ink printer is the most important tool you’ll need. It’s a special printer that uses food-safe ink to print images onto edible paper. These printers are similar to regular inkjet printers, but the ink cartridges are filled with edible ink made from food coloring and other ingredients.
2. Edible Paper
There are two common types of edible papers: wafer paper and fondant paper.
Wafer Paper: This is a thin, slightly crispy paper made from potato starch. It has a delicate texture and can absorb ink very well, but it doesn’t have a smooth surface like fondant. Wafer paper is great for creating textured effects on cakes.
Fondant Paper: Fondant paper is a thicker, smoother paper made from sugar. It has a similar texture to fondant and works well for printing detailed, smooth images. It’s ideal for creating clean, precise pictures.
3. Edible Ink
Edible ink is specially formulated to be safe for consumption. It is used in edible printers and is available in a variety of colors. The ink is made from food-grade ingredients and is designed to be absorbed into edible papers, allowing the image to transfer cleanly.
4. Fondant or Buttercream (Optional)
When applying an edible picture to a cake, you’ll need a smooth surface for the image to adhere to. Most decorators use fondant or a thick layer of buttercream to create a clean, flat surface for the edible image. This makes it easier to apply the picture and helps it stick to the cake.
5. Scissors or a Cutter
Once your edible image is printed, you’ll need scissors or a cutter to trim the image to the desired shape and size. A precision cutter can help you achieve clean, sharp edges.
6. A Cake to Decorate
Lastly, you’ll need a cake to decorate! Whether you’re using a store-bought cake or making your own from scratch, make sure it has a smooth surface that’s ready for decoration.
Step-by-Step Guide to Making Edible Pictures on Cakes
Now that you have all your materials, let’s go through the step-by-step process of making edible pictures for cakes.
Step 1: Choose the Image
The first step in making edible pictures is choosing the image you want to use. This can be a photograph, a digital design, or even a logo. The image should be high quality and high resolution to ensure that the final print looks sharp and clear.
If you’re using a photograph, make sure it has good contrast and brightness. Images that are too dark or blurry might not print well and can appear washed out. You can use photo editing software like Adobe Photoshop or free online tools to adjust the image to fit your needs before printing.
Step 2: Print the Image onto Edible Paper
Once you’ve chosen the image, it’s time to print it onto edible paper. Start by placing the edible paper into your edible ink printer. Make sure that the printer is properly set up with edible ink cartridges and that the paper is aligned correctly.
Wafer Paper: When using wafer paper, make sure the printer settings are set to print in high quality. Wafer paper is thinner, so it can absorb ink quickly, and the image should appear vibrant once printed.
Fondant Paper: If you’re using fondant paper, be careful not to let the ink soak in too much. Fondant paper tends to be thicker, so you may need to adjust the printer’s settings to ensure the ink sits on top of the paper without bleeding into it.
Once you’ve selected the proper print settings, send your image to the printer. Be sure to let the image dry for a few minutes before handling it to avoid smudging.
Step 3: Prepare the Cake
While your edible image is printing, prepare your cake. If you’re working with a round cake, use a sharp knife to level the top and create a flat surface. If you’re covering the cake with fondant, make sure it is smooth and free from any bumps or imperfections.
For cakes decorated with buttercream, apply a thin layer of buttercream over the entire surface. This will create a smooth, even base for the edible picture to adhere to. Once the base is prepared, allow it to set for a few minutes to ensure that the frosting is firm.
Step 4: Trim the Edible Image
Once your image is printed and dry, use scissors or a precision cutter to trim the edges of the edible paper. Be sure to cut as close to the image as possible without damaging the design. If your image has a specific shape (like a character or logo), use a cutter to achieve clean, precise edges.
If your design is square or rectangular, you can also round the edges slightly to give it a more professional and polished appearance. This is especially important if you’re applying the image to a round cake.
Step 5: Apply the Edible Image to the Cake
Now that your edible image is ready, it’s time to apply it to the cake. Start by gently peeling the image from the backing paper. If the paper is stuck, you can use a small amount of water or a soft brush to lightly moisten the edges of the wafer paper to loosen it.
If you’re using fondant, it’s easier to just place the image directly on top of the fondant. If you’re applying the image to buttercream, make sure the buttercream is firm but not too hard. This will help the image stick to the cake.
Gently press the edible image onto the surface of the cake. Start at one edge and smooth it down gradually to avoid air bubbles. You can use a fondant smoother or your hands to smooth the image onto the cake. Be careful not to tear the edible paper.
Step 6: Final Touches
Once the edible image is applied, you can add finishing touches to the cake. You may choose to add piping around the edges of the image, create additional decorations with fondant or buttercream, or add edible glitter for a touch of sparkle.
If you want the image to stand out, consider adding colored borders or accents around the edges. You can use fondant, royal icing, or buttercream to create a more decorative look.
Step 7: Let the Cake Set
Allow the cake to sit for a few hours before serving. This will give the edible image time to set properly and ensure that it adheres to the cake. Edible images will naturally absorb into fondant, and they will remain vibrant for several days if stored in a cool, dry place.
Troubleshooting Edible Pictures
While making edible pictures on cakes is relatively straightforward, there can be a few challenges. Here are some common issues and how to solve them:
1. Smudging
If your edible image smudges, it’s usually because the ink hasn’t dried completely before being applied. Always allow the printed image to dry for several minutes before handling it.
2. Edible Paper Sticking to the Printer
If the edible paper is sticking to your printer, it might be too damp or not feeding into the printer correctly. Make sure the paper is dry before printing and that it’s properly aligned with the printer.
3. Image Blurring or Fading
If the image looks blurry or faded, this could be due to poor quality images or incorrect printer settings. Always use high-resolution images and ensure the printer settings are optimized for edible ink.
4. Image Not Adhering to the Cake
If the edible image isn’t sticking to the cake, you can lightly brush the back of the edible paper with water or use a small amount of edible glue to help it stick. Be careful not to over-moisten the image.
Conclusion
Making edible pictures for cakes is a fun and creative way to add a personal touch to your baked goods. With the right materials, tools, and techniques, you can create stunning, custom designs that will make any occasion special. Whether you’re printing a photo, logo, or design, edible images provide endless possibilities for cake decoration. So, get your edible printer, paper, and ink ready, and start making beautiful edible pictures on cakes today!
Related topics:


