Butter cookies are a classic treat enjoyed by many for their crisp texture and rich, buttery flavor. Whether it’s for a special occasion, a holiday gathering, or just a simple snack, butter cookies never fail to satisfy. While a cookie press can help you create uniform, intricate shapes, it’s not necessary to make these delicious cookies. You can easily bake butter cookies without a cookie press by using simple kitchen tools and techniques.
In this article, we’ll walk you through how to make butter cookies without the need for a cookie press. You’ll learn the step-by-step process, helpful tips, and variations to customize your cookies to suit your taste. Plus, we’ll cover why butter cookies are so beloved and how to achieve the perfect texture and flavor, all while using tools you already have in your kitchen.
What Are Butter Cookies?
Butter cookies are sweet, crisp biscuits made from a dough that is high in butter, which gives them a delicate, melt-in-your-mouth texture. They are also often called shortbread cookies due to their buttery flavor and crumbly texture. Traditionally, butter cookies are made using just a few key ingredients: butter, sugar, flour, and a pinch of salt. Some recipes may include a little vanilla extract for extra flavor, while others add decorations or dips for variety.
Butter cookies are simple to make, and although a cookie press can help you shape them quickly and uniformly, the dough can be shaped by hand or with cookie cutters if you don’t have one. This article will show you how to create beautifully shaped butter cookies, even without specialized tools.
Ingredients You’ll Need
Before we dive into the steps of making butter cookies, let’s take a look at the ingredients you’ll need. Butter cookies are all about simple, high-quality ingredients, so don’t skimp on them.
Key Ingredients:
Butter: The star ingredient in butter cookies, which gives the cookies their signature flavor and texture. Use unsalted butter for the best control over the salt content.
Sugar: Granulated white sugar is commonly used to sweeten the dough. Some recipes may call for powdered sugar, but granulated works just fine.
All-purpose flour: The primary dry ingredient that forms the base of the dough. You can sift the flour before mixing it in to make the dough smoother.
Vanilla extract: This adds a subtle, sweet flavor that complements the buttery taste of the cookies.
Salt: A small pinch of salt balances the sweetness of the cookies and enhances their flavor.
Optional:
Egg yolk: While some butter cookie recipes don’t require egg yolk, it can be used to give the dough a smoother texture and richer color.
Decorative toppings: Sprinkles, sugar crystals, or even a chocolate drizzle can be used to add a fun touch to the cookies.
How to Make Butter Cookies Without a Cookie Press
Making butter cookies without a cookie press is easy, and you can use a few simple methods to shape them. Follow these steps to create your own delicious butter cookies from scratch.
Step 1: Prepare Your Ingredients
Start by preparing all your ingredients. Measure out the required amount of butter, sugar, flour, and any other optional ingredients you plan to use. Make sure your butter is at room temperature. This ensures it will mix more easily with the sugar and create a smooth, creamy dough.
Tip:
Let the butter sit out for about 30 minutes before starting to make the dough. Softened butter will blend better with sugar and other ingredients, creating a smooth and creamy texture.
Step 2: Mix the Butter and Sugar
In a large mixing bowl, cream together the softened butter and granulated sugar using an electric hand mixer or stand mixer. Beat them together on medium speed for about 3–5 minutes, or until the mixture is light and fluffy. This process helps to incorporate air into the dough, which contributes to the cookie’s texture.
If you don’t have a mixer, you can use a wooden spoon to beat the butter and sugar together by hand. Just make sure the butter is soft enough to mix easily.
Tip:
Add a teaspoon of vanilla extract at this stage to enhance the flavor of your cookies.
Step 3: Add the Dry Ingredients
Next, sift the all-purpose flour and salt together into a separate bowl. Sifting the dry ingredients helps prevent clumps and ensures an even distribution of flour. Gradually add the sifted flour and salt mixture into the butter and sugar mixture, mixing on low speed until just combined. Be careful not to overmix, as this can cause the cookies to become tough.
If you’re using egg yolk, you can add it to the dough at this stage. Mix it in until fully incorporated.
Step 4: Chill the Dough
Once the dough is fully mixed, it’s time to chill it. Divide the dough into two portions and wrap each portion in plastic wrap. Place the dough in the refrigerator for at least 30 minutes to chill. Chilling the dough makes it easier to roll out and cut into shapes.
Tip:
Chilling the dough also helps the cookies retain their shape when baking. If you skip this step, the cookies may spread too much in the oven.
Step 5: Roll Out the Dough
After the dough has chilled, remove it from the fridge. If the dough feels too firm, let it sit at room temperature for a few minutes before rolling it out.
Place a sheet of parchment paper or a silicone baking mat on your countertop or a large cutting board. Lightly flour the surface to prevent the dough from sticking. Take one portion of dough and roll it out with a rolling pin to about 1/8 inch thickness. If the dough starts to stick to the rolling pin, sprinkle a little more flour on top.
Tip:
If you want your cookies to have uniform thickness, you can use rolling pin rings to ensure even rolling. These rings attach to the sides of the rolling pin and help you roll the dough to a consistent thickness.
Step 6: Shape the Cookies
Now comes the fun part: shaping the cookies! Since you don’t have a cookie press, you can use a few different methods to cut out the cookies.
Option 1: Use Cookie Cutters
Choose your favorite cookie cutter shape, and press it firmly into the rolled-out dough to cut out the cookies. If the dough starts to stick to the cutter, dip it in a little flour to help it release more easily.
Option 2: Shape by Hand
If you prefer to make round cookies, you can simply scoop spoonfuls of dough and roll them into small balls. Place the dough balls on a lined baking sheet. Flatten each ball slightly with a fork or the back of a spoon to create a simple, classic butter cookie shape.
Option 3: Make Pinwheel or Swirl Cookies
For a more decorative look, you can roll the dough into a log and slice it into thin rounds to create pinwheel-shaped cookies. You can also roll two different-colored doughs together (like chocolate and vanilla) to create a swirl pattern.
Step 7: Bake the Cookies
Preheat your oven to 350°F (175°C) and line a baking sheet with parchment paper or a silicone baking mat. Place your shaped cookie dough on the baking sheet, leaving a little space between each cookie to allow for spreading.
Bake the cookies in the preheated oven for about 10–12 minutes or until the edges are lightly golden. Keep an eye on them to ensure they don’t overbake, as butter cookies can brown quickly.
Tip:
If you’re making different shapes, baking times may vary. Check the cookies a minute or two before the suggested time, and adjust if needed.
Step 8: Cool the Cookies
Once the cookies are baked, remove them from the oven and allow them to cool on the baking sheet for a few minutes. After they’ve cooled slightly, transfer them to a wire rack to cool completely. This helps the cookies firm up and gives them their signature crisp texture.
Tip:
If you want to add a little extra sweetness or decoration, you can dust the cooled cookies with powdered sugar or dip them in melted chocolate before serving.
Variations to Try
While butter cookies are delicious on their own, you can always add your personal touch by experimenting with different flavors or toppings. Here are some fun variations you can try:
1. Chocolate Chip Butter Cookies
Add mini chocolate chips to the dough for a delicious twist on the classic butter cookie. Simply fold in about 1/2 cup of chocolate chips before chilling the dough.
2. Lemon Butter Cookies
For a zesty flavor, add lemon zest and a little lemon juice to the dough. The fresh citrus will brighten up the cookies and add a refreshing twist.
3. Almond Butter Cookies
Add finely ground almonds to the dough for a nutty flavor. You can also sprinkle sliced almonds on top of the cookies before baking.
4. Sugar-Coated Butter Cookies
Before baking, roll the cookie dough balls in coarse sugar or sparkling sugar. This adds extra sweetness and a little crunch to the cookies.
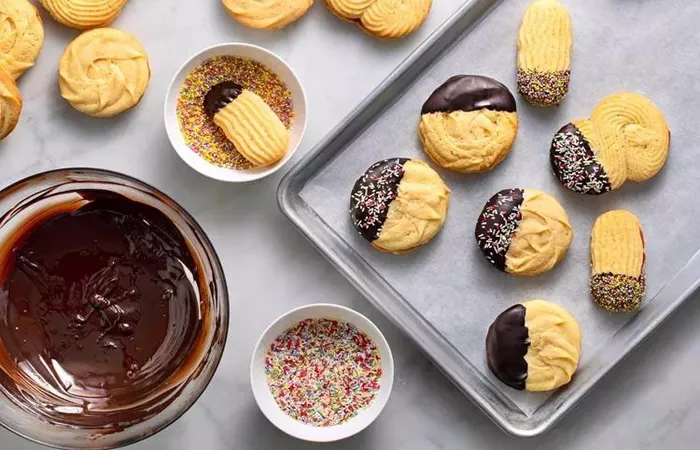
5. Chocolate-Dipped Butter Cookies
After the cookies have cooled, dip half of each cookie into melted dark or white chocolate. Let the chocolate set for a luxurious finish.
Conclusion
Making butter cookies without a cookie press is easy and fun! By following these simple steps, you can create delicious, buttery cookies with beautiful shapes, all without needing any specialized equipment. Whether you’re making classic shapes with cookie cutters or shaping the dough by hand, butter cookies are a delightful treat that everyone will enjoy. Don’t forget to experiment with flavors and toppings to make the recipe your own. Happy baking!
Related topics:


