Hot cocoa bombs have become a popular treat for both kids and adults alike, offering a fun and festive twist on a classic hot chocolate drink. These delightful chocolate spheres are filled with cocoa powder, marshmallows, and other delicious goodies. When dropped into hot milk, they “explode” into a warm, creamy, and flavorful cocoa drink. Hot cocoa bombs are not only delicious but also make for an impressive gift, especially around the holidays.
In this article, we will guide you through the process of making your very own hot cocoa bombs using candy melts, which are an easy-to-melt, colorful chocolate alternative. Whether you’re a beginner or an experienced baker, we’ll provide simple, step-by-step instructions to ensure that your cocoa bombs turn out perfectly every time. Let’s dive in!
What Are Hot Cocoa Bombs?
Before we jump into the process of making hot cocoa bombs with candy melts, it’s important to understand what they are and why they’ve become so popular.
A hot cocoa bomb is essentially a sphere made of chocolate that’s filled with all the ingredients necessary to make a cup of hot cocoa. These spheres are usually made by melting chocolate and forming the molds into half-spheres, which are then filled with a mixture of hot cocoa powder and mini marshmallows (though you can get creative with the fillings). The bomb is then sealed together to form a complete sphere. When dropped into a mug of hot milk, the sphere melts, releasing the cocoa powder and marshmallows inside, creating a delicious cup of hot cocoa.
Candy melts are a perfect choice for making these cocoa bombs. They are available in a variety of colors and flavors, and they melt easily, making them ideal for molding into perfect spheres. Unlike regular chocolate, candy melts do not require tempering, making them a great choice for beginners.
What You’ll Need to Make Hot Cocoa Bombs with Candy Melts
To create your own hot cocoa bombs using candy melts, you will need the following ingredients and tools:
Ingredients:
Candy Melts: These are available in many colors and flavors. Choose white, milk, or dark chocolate candy melts, or even go for some fun colors like pink or blue for special occasions. You can find candy melts at most craft stores, online retailers, or baking supply stores.
Hot Cocoa Powder: Choose your favorite hot cocoa powder mix. You can also make your own mix by combining cocoa powder, sugar, and a pinch of salt.
Mini Marshmallows: These tiny, fluffy marshmallows are the traditional filling for cocoa bombs, adding sweetness and texture to your drink.
Optional Add-ins: You can get creative with your cocoa bomb fillings. Consider adding crushed candy canes, chocolate chips, caramel bits, or even a sprinkle of cinnamon or peppermint extract.
Sprinkles or Drizzle (Optional): For decoration, you can use colored sprinkles, edible glitter, or drizzle additional melted candy melts over the top of the cocoa bombs.
Tools:
Silicone Cocoa Bomb Molds: These molds come in two halves that will be filled with the melted candy melts and then pressed together to form a sphere. Silicone molds are easy to use and flexible, making it easier to pop the cocoa bombs out once they’re set.
Microwave-Safe Bowl: To melt the candy melts, a microwave-safe bowl is essential. Make sure the bowl is large enough to fit your candy melts in a single layer.
Spoon or Small Scoop: You’ll need this for scooping the melted candy into the molds and filling them evenly.
Heat Gun or Small Kitchen Torch (Optional): This is useful for sealing the halves of the cocoa bombs together and creating a smooth, glossy finish. You can also use the heat from a microwave or stovetop for this purpose.
Step-by-Step Guide to Making Hot Cocoa Bombs with Candy Melts
1. Prepare Your Workspace
Before you begin making your hot cocoa bombs, make sure you have a clean and organized workspace. This will help you stay focused and ensure that everything goes smoothly.
- Clear a flat surface where you can work on molding and decorating your cocoa bombs.
- Gather all your ingredients and tools.
- If you are using a microwave, clear out a clean area to melt your candy melts.
2. Melt the Candy Melts
The first step is to melt your candy melts. This process is simple, but it’s important to melt them slowly to prevent overheating and burning.
- Place the candy melts in a microwave-safe bowl. If you’re using multiple colors or types of candy melts, you can melt them separately.
- Heat the candy melts in the microwave on 30-second intervals, stirring in between. After each interval, stir to make sure the candy melts are evenly melted and smooth.
- Be careful not to overheat the candy melts. If they start to seize up or become too thick, you can add a small amount of vegetable oil or shortening to thin them out.
3. Fill the Molds with Candy Melts
Once your candy melts are fully melted and smooth, it’s time to start filling the molds.
- Using a spoon or small scoop, carefully fill each half of the silicone cocoa bomb molds with the melted candy melts. Make sure to coat the sides evenly, and don’t worry about the center being fully covered at this point. The goal is to create a thick layer of candy melt around the mold.
- After filling the mold, gently tap the mold on the countertop to remove any air bubbles.
- Place the molds in the freezer or refrigerator for about 5 to 10 minutes, or until the candy melts have hardened completely.
4. Remove the Cocoa Bombs from the Molds
Once the candy melts have fully set and hardened, gently pop the cocoa bombs out of the silicone molds. Be careful not to crack or break the delicate chocolate. If you used a silicone mold, this should be easy—simply push the sides of the mold and the bombs will come out effortlessly.
If any edges or parts of the cocoa bombs are uneven, you can smooth them out using a small kitchen torch or a heat gun. Carefully heat the edges of the cocoa bombs to soften them slightly, and then gently press them together to smooth out any imperfections.
5. Fill the Cocoa Bombs with Hot Cocoa Ingredients
Now that you have your hollow candy melt spheres, it’s time to fill them with the hot cocoa ingredients.
- Take one of the chocolate halves and place a small spoonful of hot cocoa powder inside. You don’t need too much—just enough to fill the bottom of the sphere.
- Next, add a handful of mini marshmallows. This adds the classic hot cocoa experience. You can also add other mix-ins at this point, such as chocolate chips, crushed peppermint, or caramel bits.
- Repeat this for each cocoa bomb half.
6. Seal the Cocoa Bombs
Once the cocoa bombs are filled, it’s time to seal them shut.
- Heat a plate or a flat surface in the microwave for about 20 seconds. This will create a warm surface that will help melt the edges of the cocoa bombs.
- Take the other half of the cocoa bomb and gently place it onto the filled half. Press the two halves together, making sure they are aligned properly. If the edges don’t stick immediately, use the heat gun or a small kitchen torch to slightly melt the edges. Gently press the halves together until they seal completely.
- If desired, drizzle some extra melted candy melts over the seam to decorate and reinforce the seal.
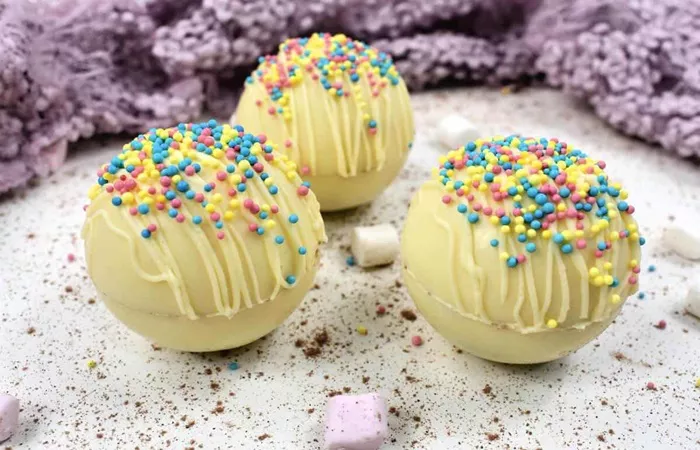
7. Decorate the Cocoa Bombs (Optional)
While your hot cocoa bombs are already adorable, you can make them extra special by decorating them with sprinkles, edible glitter, or extra melted candy melts. You can even add a little tag or bow if you plan to gift them.
To decorate, simply melt some candy melts in a different color and drizzle them over the top of the cocoa bombs. You can also sprinkle some colorful sprinkles or crushed candy canes for a festive touch.
8. Enjoy Your Hot Cocoa Bombs!
Once your hot cocoa bombs are fully set and decorated, they’re ready to enjoy!
To use them, simply drop a cocoa bomb into a mug of hot milk. The cocoa bomb will melt, releasing the cocoa powder and marshmallows inside, creating a rich and delicious cup of hot cocoa. Stir it up, and enjoy!
9. Storage Tips
If you’re not planning on using your cocoa bombs right away, you can store them for later.
- Store them in an airtight container at room temperature for up to two weeks.
- If you want to make them ahead of time for holiday gifting, keep them in a cool, dry place, away from heat or humidity.
Final Thoughts
Making hot cocoa bombs with candy melts is a fun and creative way to enjoy hot chocolate, whether you’re treating yourself or making a thoughtful gift for someone special. With just a few simple ingredients and tools, you can create these delightful chocolate spheres that are sure to wow everyone.
Remember to get creative with your fillings and decorations to make your cocoa bombs unique. Whether you stick with the classic cocoa and marshmallows or add a twist with candy pieces and sprinkles, hot cocoa bombs are a perfect treat for any occasion. So, grab your molds, your candy melts, and start crafting these delicious little bombs of joy!
Related topics: