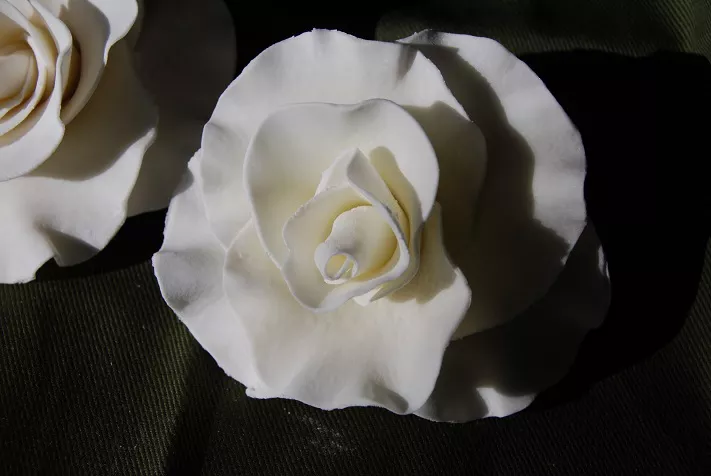
Sugar paste roses are exquisite edible creations that elevate any cake from ordinary to extraordinary. These delicate, lifelike blossoms are a hallmark of professional cake decorating, adding a touch of elegance and sophistication to your confectionery creations. In this comprehensive guide, we will walk you through the step-by-step process of crafting sugar paste roses like a true artisan. From selecting the right tools and materials to perfecting the intricate details, this article will equip you with the knowledge and skills to create stunning sugar paste roses that will leave a lasting impression.
Gathering the Essential Tools and Materials
To embark on your sugar paste rose-making journey, it is crucial to gather the necessary tools and materials. Here’s a list of items you’ll need:
Sugar Paste (also known as gum paste)
Rolling Pin
Non-stick Surface (such as a silicone mat or cornstarch-dusted surface)
Rose Petal Cutters (varying sizes for different layers)
Ball Tool (for thinning and shaping petals)
Foam Pad (soft surface for shaping petals)
Edible Glue or Water
Small Paintbrush (for applying glue or water)
Wire (for creating a stem, if desired)
Floral Tape (for wrapping the wire stem)
Edible Dusts (optional, for adding color and depth)
Piping Gel (for attaching finished roses to the cake)
Preparing the Sugar Paste
Begin by kneading the sugar paste until it becomes pliable and smooth. Ensure it is free from any cracks or air bubbles. If you’re planning to color your roses, add a small amount of food coloring at this stage and knead until the color is evenly distributed. Remember, a little goes a long way, so start with a small amount and add more as needed.
Creating the Rose Bud
The rose bud is the heart of your sugar paste rose, and mastering its form is essential. Roll a small piece of sugar paste into a smooth ball. This will serve as the bud’s center. Insert a wire into the base of the bud, leaving about an inch protruding. If using a wire, ensure it is food-safe and covered with floral tape.
Next, create a cone shape around the center by thinning and flattening a small amount of sugar paste. Gently wrap this around the center, allowing it to taper as it extends outwards. Use a ball tool to soften and thin the edges, giving them a natural curve.
Crafting the Outer Petals
Sugar paste roses are known for their intricate layers of petals. Roll out a thin sheet of sugar paste and use a larger rose petal cutter to create the outermost layer. Thin the edges of each petal using the ball tool on the foam pad to give them a lifelike appearance.
Attach these petals to the bud using a small amount of edible glue or water. Ensure they are evenly spaced around the bud, and slightly overlap one another for a natural look. Gently cup the petals with your fingers to add depth and realism.
Building Layers of Petals
Continue adding layers of petals, gradually decreasing the size of the cutters as you work towards the center. Each layer should have slightly smaller and more tightly clustered petals than the previous one. Remember to thin the edges and shape the petals for a lifelike appearance.
Shaping and Texturing the Petals
To achieve a truly authentic look, take the time to add texture and dimension to your sugar paste roses. Use a veining tool or a toothpick to create subtle lines and ridges on the petals. This step adds depth and realism, mimicking the natural veins found on real rose petals.
Creating the Rose’s Calyx
The calyx is the green, leafy structure at the base of the rose. Roll out a small piece of green sugar paste and cut out a simple, five-lobed shape to represent the calyx. Attach it to the base of the rose with a dab of edible glue or water.
Optional: Adding Color and Detail
For an extra touch of realism, consider using edible dusts to add color variations and depth to your sugar paste roses. Use a soft brush to apply dust sparingly, focusing on the creases and edges of the petals.
Optional: Wiring and Taping the Stem
If you wish to create a wired stem for your sugar paste rose, insert a wire into the base of the bud before attaching the petals. After the rose is complete, wrap the wire with floral tape to secure it. This step provides stability and allows you to position the rose on the cake with ease.
Attaching the Sugar Paste Roses to Your Cake
To affix your beautifully crafted sugar paste roses to the cake, use a small amount of piping gel on the desired location. Gently press the base of the rose onto the gel, ensuring it adheres securely.
Conclusion
With patience, practice, and attention to detail, you can master the art of creating sugar paste roses like a professional. Remember, each rose is a unique masterpiece, and embracing imperfections adds to their charm. Experiment with colors, sizes, and petal arrangements to craft roses that suit your specific vision.


