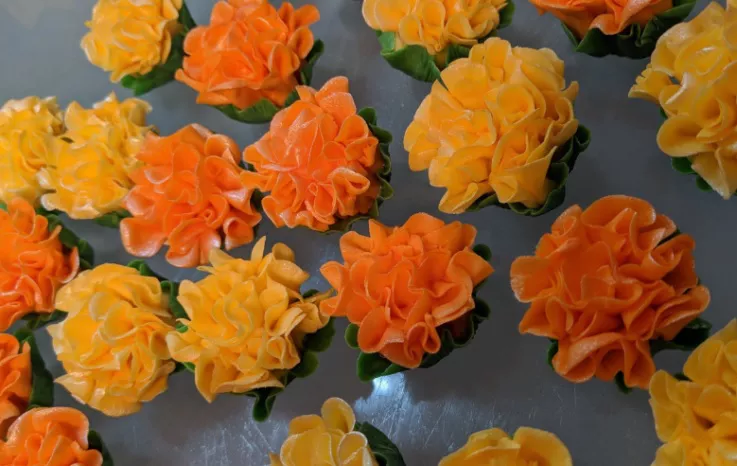
Sugar paste flowers are exquisite, edible decorations that can take your cake decorating skills to the next level. Whether you’re a professional baker or a passionate home baker, the art of creating sugar paste flowers is a valuable skill to master. These delicate, lifelike blossoms can adorn cakes, cupcakes, and other sweet creations, adding a touch of elegance and sophistication. In this comprehensive guide, we will explore the step-by-step process of making sugar paste flowers, from selecting the right materials to creating intricate petal details.
Getting Started with Sugar Paste Flowers
Before diving into the creative process, it’s essential to gather the necessary materials and tools for making sugar paste flowers. Here’s a list of what you’ll need:
Gum Paste or Flower Paste: Gum paste, also known as flower paste, is the primary material for crafting sugar paste flowers. It is a pliable, edible substance made from sugar, gelatin, and other ingredients. Gum paste allows for fine detailing and dries to a firm, yet delicate, consistency.
Edible Food Colors: You’ll need food colors to tint your gum paste to the desired shades for your flowers. Gel or paste food colors are preferred, as they provide vibrant colors without adding excess moisture.
Floral Wire: Floral wires come in various gauges, and you’ll need them to create stems for your sugar paste flowers. Thinner wires are used for smaller blossoms, while thicker wires are suitable for larger flowers.
Floral Tape: Floral tape is used to wrap around the floral wire to secure the petals and create realistic-looking stems for your sugar paste flowers.
Rolling Pin: A rolling pin is essential for rolling out the gum paste to the desired thickness, ensuring it is smooth and even.
Ball Tool: A ball tool is used to thin and shape the edges of the petals, creating a realistic, curved appearance.
Petal and Leaf Cutters: Petal and leaf cutters are available in various shapes and sizes to help you cut gum paste into different petal and leaf designs.
Foam Pads: Foam pads provide a soft surface to work on when thinning and shaping the petals and leaves.
Flower Formers: Flower formers are used to allow your sugar paste flowers to dry in realistic, three-dimensional shapes.
Cornstarch or Powdered Sugar: Dusting your work surface with cornstarch or powdered sugar will prevent the gum paste from sticking.
Selecting Flower Types and Colors
Choosing the type of flower you want to create and its colors is the first step in crafting sugar paste flowers. Research your chosen flower’s anatomy, color, and proportions to ensure a realistic result. For beginners, it’s advisable to start with simpler flowers like daisies or blossoms, as they require fewer petals and are more forgiving in terms of shaping and assembly.
Once you’ve selected your flower type, decide on the colors you’ll need to achieve the desired effect. Remember to tint your gum paste in advance with gel or paste food colors, ensuring that the colors are uniform and well-mixed.
Creating Sugar Paste Petals
The process of making sugar paste flowers begins with crafting individual petals. Here’s a step-by-step guide:
Roll Out the Gum Paste: Start by rolling out a small portion of gum paste on a cornstarch or powdered sugar-dusted surface. The thickness will vary depending on the flower, but it’s typically around 1-2 millimeters.
Cut Out Petals: Use petal cutters to cut out the desired number of petals. Gently press the cutter into the gum paste, twist it slightly, and lift to release the petal.
Thin the Edges: Place the petal on a foam pad and use a ball tool to thin and shape the edges. Start from the center of the petal and work your way outward, creating a gently curved, realistic appearance.
Create Veins: For added realism, you can use veining tools or even the back of a paintbrush to create vein lines on the petals. These lines can be subtle or more pronounced, depending on the flower type.
Let Petals Dry: Place the petals on a flower former to dry. The drying time may vary, but it typically takes a few hours to a day, depending on the humidity and the thickness of the gum paste.
Repeat the Process: Repeat this process to create the desired number of petals for your sugar paste flowers.
Assembling Sugar Paste Flowers
Once you’ve crafted all the necessary petals, it’s time to assemble your sugar paste flowers. The assembly process varies depending on the flower type but generally follows these steps:
Wire the Petals: Insert a thin floral wire into the base of each petal, ensuring it goes about halfway up the petal. This will serve as the flower’s stem.
Wrap with Floral Tape: Secure the petal to the wire by wrapping it with green floral tape. Make sure the tape covers the wire and blends seamlessly with the petal.
Layer the Petals: Begin by attaching the largest petals to the wire first. Add a small amount of gum paste or royal icing at the base of the petal to secure it to the wire. Continue adding petals, staggering them to create a realistic look.
Form the Center: If your flower has a center, create it separately and attach it to the center of the petals using gum paste or royal icing.
Let the Flower Dry: Place your assembled flower on a flower former or in a foam pad to dry. This step is crucial for ensuring that the petals hold their shape.
Adding Leaves and Greenery
In addition to petals, you can also create gum paste leaves and greenery to accompany your sugar paste flowers. Follow these steps to create and add leaves to your floral arrangements:
Roll Out Gum Paste: Roll out green-tinted gum paste and use leaf cutters to cut out leaf shapes.
Thin the Edges: Similar to the petal-making process, thin the edges of the leaves with a ball tool to create realistic veining and shape.
Wire and Tape the Leaves: Attach a thin floral wire to the base of each leaf, wrap it with green floral tape, and position the leaves at the base of your sugar paste flowers.
Let the Leaves Dry: Allow the leaves to dry on a foam pad or in a flower former to retain their shape.
Adding Details and Accents
To make your sugar paste flowers truly stunning, consider adding additional details and accents. This can include:
Dusting with Edible Powder: Use edible dusting powders to add a touch of color and depth to your flowers. These powders can highlight the petal edges, create shading, or add a subtle sheen.
Edible Glitter and Luster Dust: Edible glitter and luster dust can add a shimmering effect to your sugar paste flowers, making them even more eye-catching.
Brush with Edible Paints: Edible paints can be used to add intricate details, such as dots, lines, or color gradients, to your flowers.
Small Edible Pearls or Dragees: Small edible pearls or dragees can be attached to the flower centers or used as accents to enhance the overall appearance.
Storage and Presentation
To preserve your sugar paste flowers and keep them looking their best, store them in a cool, dry place, away from direct sunlight and humidity. You can keep them in an airtight container or a cake box lined with parchment paper. When it’s time to use them, gently insert the floral wire stems into your cake or cupcakes to create a stunning presentation.
Conclusion
Creating sugar paste flowers is a skill that can elevate your cake decorating to a professional level. With the right materials, techniques, and attention to detail, you can craft lifelike, edible blossoms that are sure to impress.


