The holiday season is synonymous with warmth, joy, and delightful traditions, and one of the most beloved customs is baking Christmas cookies. Whether you’re a seasoned baker or a novice in the kitchen, preparing a batch of these sweet treats is a heartwarming and festive way to share love and create cherished memories. In this comprehensive guide, we will explore all the ingredients, tools, and techniques you need to make Christmas cookies that will fill your home with the delightful aroma of the season.
The Heart of the Matter: Essential Christmas Cookie Ingredients
Creating delicious Christmas cookies starts with quality ingredients. Before you begin your holiday baking journey, let’s take a closer look at the key components:
Ingredients:
Flour: All-purpose flour is a fundamental component of most cookie recipes. It provides structure and contributes to the desired texture of the cookies.
Sugar: Granulated sugar is commonly used for sweetness, while brown sugar adds a delightful hint of molasses and creates chewier cookies.
Butter: Unsalted butter serves as the fat source in most cookie recipes. It provides flavor, tenderness, and a lovely crumb.
Eggs: Eggs are a binding agent that helps combine all the ingredients and give structure to the dough.
Baking Powder and Baking Soda: These leavening agents help cookies rise and become light and airy. The choice of which to use depends on the recipe.
Salt: A pinch of salt enhances the flavor of the cookies and balances the sweetness.
Vanilla Extract: Vanilla extract adds depth and aromatic sweetness to the cookies. It’s a staple in most recipes.
Mix-Ins (Optional): Depending on your choice, you can add chocolate chips, chopped nuts, dried fruits, or any other ingredients that make your Christmas cookies uniquely yours.
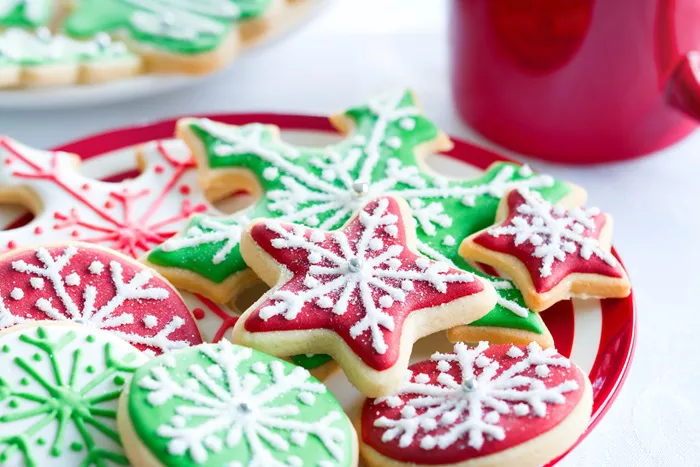
Decorative Elements (Optional): For decorating cookies, you’ll need royal icing, food coloring, sprinkles, and any other decorative items that capture the spirit of the holiday.
Mixing It Up: Essential Kitchen Tools
Having the right tools in your kitchen can make the process of making Christmas cookies smoother and more enjoyable. Here’s a list of the essential equipment:
Kitchen Tools:
Mixing Bowls: You’ll need a selection of mixing bowls in various sizes to combine and mix the ingredients.
Hand Mixer or Stand Mixer: While you can mix cookie dough by hand, an electric mixer will save you time and effort. A hand mixer is convenient, but a stand mixer with a paddle attachment is ideal for larger batches.
Measuring Cups and Spoons: Precise measurements are crucial for successful baking. Invest in a good set of measuring cups and spoons.
Rubber Spatula: A rubber spatula is handy for scraping down the sides of the mixing bowl and ensuring that all ingredients are well incorporated.
Whisk: A whisk is useful for blending dry ingredients and creating a uniform mixture.
Baking Sheets: You’ll need sturdy baking sheets to accommodate your cookie dough. Consider lining them with parchment paper for easy cleanup.
Cookie Cutters: If you plan to make cut-out cookies, a variety of cookie cutters in different shapes and sizes are essential.
Cooling Racks: Cooling racks allow air to circulate beneath the cookies, preventing them from becoming soggy on the bottom as they cool.
Rolling Pin: A rolling pin is crucial for rolling out and shaping cookie dough, especially for cut-out cookies.
Pastry Brush: If you plan to glaze or brush your cookies, a pastry brush is a handy tool for even distribution.
Cookie Spatula: A thin, flat spatula is perfect for transferring delicate cookies from the baking sheet to the cooling rack.
Preparing for Perfection: Essential Pre-Baking Steps
Before you dive into mixing and baking your Christmas cookies, there are some pre-baking steps to consider:
Pre-Baking Steps:
Read the Recipe: Start by carefully reading the entire recipe to ensure you understand the process and have all the ingredients on hand.
Room Temperature Ingredients: Many cookie recipes require ingredients like butter and eggs to be at room temperature. Take these items out of the refrigerator ahead of time to allow them to reach the desired temperature.
Preheat the Oven: Preheat your oven to the specified temperature called for in the recipe. This ensures that your cookies will bake evenly.
Prepare Baking Sheets: Line your baking sheets with parchment paper or silicone baking mats to prevent cookies from sticking and make cleanup easier.
Measure Ingredients Accurately: Use your measuring cups and spoons to measure all your ingredients accurately. Baking is a science, and precise measurements are key to success.
The Baking Process: Steps to Christmas Cookie Perfection
Now that you have your ingredients and tools prepared, let’s walk through the general steps of making Christmas cookies:
Baking Steps:
Combine Dry Ingredients: In a mixing bowl, whisk together the dry ingredients such as flour, baking powder, baking soda, and salt.
Cream Butter and Sugar: In a separate mixing bowl, use your mixer to cream together the softened butter and sugar until the mixture becomes light and fluffy.
Add Eggs and Flavoring: Beat in the eggs one at a time, ensuring each is fully incorporated. Add vanilla extract or any other flavorings specified in the recipe.
Gradually Add Dry Ingredients: With the mixer on low, gradually add the dry ingredients to the wet mixture. Mix until just combined. Overmixing can lead to tough cookies.
Mix-Ins (If Desired): If your recipe calls for mix-ins such as chocolate chips or nuts, gently fold them into the dough using a spatula.
Chill the Dough (If Necessary): Depending on the recipe, you may need to chill the dough in the refrigerator for a specified period. This step is crucial for cut-out cookies.
Roll and Cut (For Cut-Out Cookies): If you’re making cut-out cookies, roll the chilled dough to your desired thickness and use cookie cutters to create shapes.
Bake the Cookies: Place the cookies on prepared baking sheets and bake according to the recipe’s instructions. It’s important to monitor the cookies closely, as baking times can vary depending on your oven and the size of the cookies.
Cool on Racks: Once baked, transfer the cookies to cooling racks. Allow them to cool completely before decorating or storing.
Decorate (Optional): If you plan to decorate your cookies, use royal icing, food coloring, sprinkles, and any other decorative elements to bring your Christmas cookies to life.
Storing and Sharing: Christmas Cookie Care
Proper storage and sharing are the final steps in your Christmas cookie journey. Here’s how to store and share your freshly baked delights:
Storage and Sharing:
Storage: To keep your cookies fresh and delicious, store them in an airtight container or cookie tin. Layer the cookies with parchment paper to prevent sticking, and place a piece of bread in the container to help maintain moisture. Store different types of cookies in separate containers to avoid flavor transfer.
Freezing: Christmas cookies can be frozen for extended freshness. Place them in an airtight container, separating layers with parchment paper, and label with the date. Cookies can be frozen for up to three months.
Sharing: Share the joy of homemade Christmas cookies with friends and family. Consider gifting them in decorative tins, boxes, or even a mason jar. Attach a handwritten note or recipe for a personal touch.
Conclusion
Baking Christmas cookies is a cherished holiday tradition that brings people together and fills homes with the delightful aroma of freshly baked treats. With the right ingredients, tools, and techniques, you can create a wide array of Christmas cookies that cater to various tastes and preferences.


