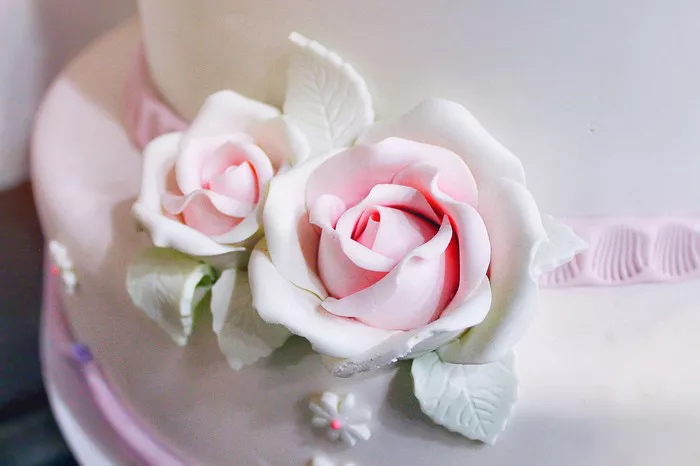
Gumpaste flowers are exquisite, lifelike decorations that can elevate any cake or dessert to a work of art. While they may seem intimidating to beginners, with the right techniques and practice, creating stunning gumpaste flowers is entirely achievable.
In this comprehensive guide, we’ll take you through the step-by-step process of making gumpaste flowers, from preparing the gumpaste to shaping and coloring the petals. So, let’s dive into the world of edible floral art and unleash your creativity!
What is Gumpaste?
Gumpaste is a versatile sugar-based dough that is commonly used to create intricate edible decorations, including flowers, leaves, and figurines. Made from a mixture of powdered sugar, gelatin, water, and sometimes added ingredients like tylose powder or gum tragacanth, gumpaste has a pliable consistency that allows it to be molded and shaped into various forms.
Gathering Your Supplies
Before you begin making gumpaste flowers, it’s essential to gather all the necessary supplies. Here’s a list of what you’ll need to get started:
1. Gumpaste:
You can either make your own gumpaste from scratch using a recipe or purchase pre-made gumpaste from a cake decorating supply store.
2. Flower Cutters:
Invest in a variety of flower-shaped cutters to create different types of flowers, such as roses, daisies, and peonies.
3. Rolling Pin:
A small rolling pin will be used to roll out the gumpaste to the desired thickness.
4. Flower Veiners:
These specialized tools are used to create realistic texture and detail on the petals of the gumpaste flowers.
5. Petal Dusts:
Petal dusts are used to add color and dimension to the gumpaste flowers. Choose a variety of colors to match the flowers you’ll be creating.
5. Floral Wires:
Floral wires are inserted into the base of the gumpaste flowers to provide support and allow them to be arranged into bouquets or attached to cakes.
6. Edible Glue:
Edible glue is used to attach the different components of the gumpaste flowers together, such as the petals and the flower centers.
By ensuring that you have all your supplies ready before you begin, you’ll make the process of creating gumpaste flowers much more efficient and enjoyable.
Preparing the Gumpaste
Before you can start shaping and molding the gumpaste into flowers, you’ll need to prepare it for use. Here are some tips and techniques for working with gumpaste:
1. Knead the Gumpaste:
Start by kneading the gumpaste until it is smooth and pliable. This will help to remove any air bubbles and ensure that the gumpaste is easy to work with.
2. Roll Out the Gumpaste:
Once the gumpaste is kneaded, use a rolling pin to roll it out to the desired thickness. For most gumpaste flowers, a thickness of around 1/8 inch is ideal.
3. Cut Out the Flower Shapes:
Use your flower-shaped cutters to cut out the desired shapes from the rolled-out gumpaste. Press the cutters firmly into the gumpaste and then carefully remove the excess around the edges.
4. Vein the Petals:
To add texture and detail to the petals of the gumpaste flowers, use flower veiners to imprint realistic veins onto the surface of the petals. Simply press the veiners gently onto the petals and then carefully remove them to reveal the textured pattern.
Shaping and Assembling the Flowers
Now that you’ve prepared the gumpaste, it’s time to start shaping and assembling the flowers. Follow these step-by-step instructions for creating beautiful gumpaste flowers:
1. Shape the Petals:
To shape the petals of the gumpaste flowers, use your fingers to gently curl the edges of each petal outward. This will give the petals a more natural and lifelike appearance.
2. Assemble the Flower:
Once all the petals have been shaped, start assembling the flower by attaching the petals together using edible glue. Begin with the smallest petals at the center of the flower and work your way outward, gradually adding larger petals as you go.
3. Add the Flower Center:
Once all the petals have been attached, add the flower center to the middle of the flower using edible glue. You can use a small ball of gumpaste or a pre-made flower center, depending on the type of flower you’re creating.
4. Attach the Floral Wire:
Finally, insert a floral wire into the base of the flower and secure it in place with edible glue. This will provide support for the flower and allow it to be arranged into bouquets or attached to cakes.
Coloring and Finishing Touches
After assembling the gumpaste flowers, you can add color and dimension to them using petal dusts. Simply dust the petals with the desired colors using a soft brush, blending the colors together to create a natural-looking gradient. You can also add additional details, such as speckles or highlights, to enhance the realism of the flowers.
Once the flowers have been colored and finished, allow them to dry completely before handling or arranging them. Depending on the thickness of the gumpaste and the humidity of your environment, this process can take anywhere from a few hours to overnight.
Conclusion
In conclusion, creating gumpaste flowers is a delightful and rewarding endeavor that allows you to unleash your creativity and add a touch of elegance to your cakes and desserts.
By following the step-by-step instructions outlined in this guide and experimenting with different shapes, colors, and techniques, you can create stunning gumpaste flowers that are sure to impress.
So, gather your supplies, roll up your sleeves, and let your imagination bloom with beautiful gumpaste flowers!

