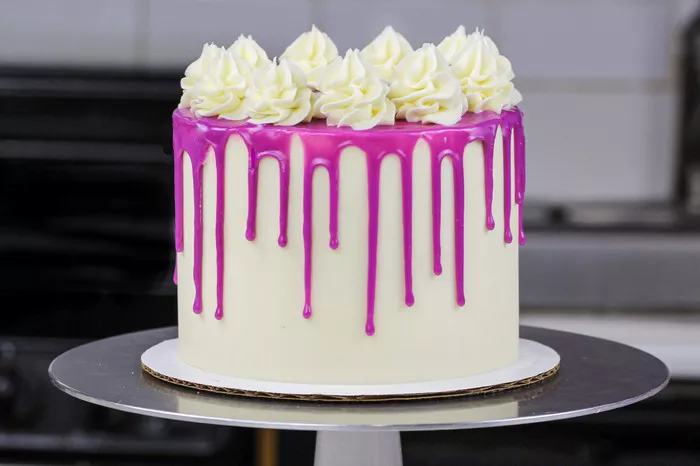
Drip cakes have surged in popularity, known for their striking appearance and delectable taste. With rich ganache or icing cascading down the sides, these cakes add an elegant touch to any celebration.
Ready to try your hand at creating your own stunning drip cake? Follow this comprehensive guide to unleash your inner cake artist.
Gathering Your Supplies
Before diving into the world of drip cakes, gather your supplies:
1. Cake Layers:
Choose your favorite cake flavor(s) and bake enough layers for your desired cake height. For example, for a standard 8-inch cake, you’ll need two to three layers.
2. Buttercream Frosting:
Use for filling and crumb coating the cake layers. To make a basic buttercream, you’ll need unsalted butter, powdered sugar, vanilla extract, and a pinch of salt.
Recipe:
- 1 cup (2 sticks) unsalted butter, softened
- 4 cups powdered sugar
- 2 teaspoons vanilla extract
- Pinch of salt
- 2-4 tablespoons milk or cream (optional, for adjusting consistency)
Instructions:
1. In a mixing bowl, beat the softened butter until creamy.
2. Gradually add the powdered sugar, one cup at a time, mixing well after each addition.
3. Add vanilla extract and salt, and beat until smooth. If the frosting is too thick, add milk or cream, one tablespoon at a time, until desired consistency is reached.
3. Ganache or Icing:
Essential for creating the drip effect. Opt for a recipe that complements your cake flavor. For a basic chocolate ganache, you’ll need chocolate and heavy cream.
Opt for a recipe that complements your cake flavor. For a basic chocolate ganache, you’ll need chocolate and heavy cream.
Recipe:
- 8 ounces semisweet or bittersweet chocolate, chopped
- 1 cup heavy cream
Instructions:
1. Place chopped chocolate in a heatproof bowl.
2. In a small saucepan, heat heavy cream until it just begins to simmer.
3. Pour hot cream over the chopped chocolate and let it sit for 1-2 minutes.
4. Stir the mixture until smooth and glossy.
4. Decorations:
Sprinkles, edible flowers, or fresh fruit for embellishing your masterpiece.
5. Piping Bags and Tips:
For applying frosting and ganache.
6. Offset Spatula:
Ensures smooth frosting application.
7. Cake Turntable:
Optional but useful for decorating.
Baking and Preparing Your Cake Layers
1. Bake the Cake Layers:
Follow your chosen recipe to bake moist, flavorful cake layers. Preheat your oven to 350°F (175°C) and grease and flour your cake pans before pouring in the batter.
Tip: To ensure even baking, rotate your cake pans halfway through the baking time.
2. Cool and Level the Cakes:
Allow cakes to cool in the pans for 10 minutes, then transfer them to wire racks to cool completely. Once cooled, use a serrated knife to level the tops of the cakes for even stacking.
3. Prepare the Frosting:
Whip up a batch of buttercream frosting until smooth and fluffy. Adjust the consistency with milk or cream if needed.
4. Crumb Coat the Cakes:
Apply a thin layer of frosting to seal in crumbs and create a smooth base for decorating. Use an offset spatula to spread the frosting evenly over the tops and sides of the cake layers.
Tip: Chill the crumb-coated cakes in the refrigerator for 30 minutes to set the frosting before applying the final coat.
Assembling and Decorating Your Drip Cake
1. Stack the Cake Layers:
Alternating cake and frosting layers, stack your cakes evenly. Use a cake board or plate between each layer to provide support.
2. Frost the Cake:
Coat the stacked cake with a generous layer of frosting, smoothing it with an offset spatula. Start with a thin layer of frosting on the top and sides to lock in any crumbs, then add more frosting for a thicker coat.
3. Prepare the Drip:
Heat ganache or thin icing to a pourable consistency. For a chocolate ganache, microwave in 20-second intervals until smooth and fluid.
Tip: Allow the ganache or icing to cool slightly before pouring it over the cake to prevent it from melting the frosting.
4. Apply the Drips:
Using a piping bag or spoon, gently squeeze or pour drips along the cake’s edge, allowing them to flow naturally down the sides. Start with a few drips and add more as needed, spacing them evenly around the cake.
5. Fill in the Top:
Pour remaining ganache or icing onto the cake’s center, spreading it evenly with an offset spatula. Use the back of the spatula to gently coax the ganache or icing to the edges, creating a smooth finish.
6. Add Decorations:
Sprinkle decorations atop the cake for a finishing touch. Get creative with edible flowers, sprinkles, or fresh fruit to complement the flavors of your cake.
Tips and Tricks for Success
1. Chilled Cake Layers:
Refrigerate cake layers before assembly for easier handling and less crumbing.
2. Consistency is Key:
Ensure ganache or icing is the right thickness for smooth, controlled drips. Test the consistency by spooning a small amount onto a plate and observing how it flows.
3. Practice Patience:
Drip cakes may require practice to perfect, so enjoy the creative process and don’t be afraid to experiment with different techniques and flavors.
Conclusion
Creating a drip cake is a delightful way to express your creativity in the kitchen. By following this guide and embracing experimentation, you’ll soon craft beautiful drip cakes worthy of any occasion. So, gather your supplies, let your imagination run wild, and prepare to impress with your stunning drip cake creations. Happy baking!

